Topic: DMD0231

Code-Block Overview
In an effort to make the programming of Do-more PLC systems as easy and efficient as possible, all of them support modular programming in the form of code-blocks that can be executed when the programmer wants, and as often as the programmer needs.
There are currently 4 different types of code-blocks that can be utilized in a Do-more Designer project, Programs, Tasks, Subroutines, and Interrupt Service Routines. Which one you choose depends largely on the type of work that needs to be accomplished. There are just a few hard and fast rules to follow when deciding which code-block to use, but because there is some overlap in the types of work that can be done in the various code-blocks, deciding on which one to use can sometimes be a confusing choice. Use the following information to help decide which code-block is the most efficient for the work you need to do.
Programs
Programs are executed by using the Run Program (RUN) instruction. Once a Program has been started, it will run every controller scan until an Exit This Program (EXIT) instruction within the Program itself is executed, another Program or Task executes a Halt Program or Task (HALT) or a Restart Program or Task (RESTART) instruction that targets the Program.
Note: it is important to know that when a Program is set to run this does NOT mean the Program begins running at that instant in time. Run means the Program will be executed when the CPU gets to it as the CPU works through the code-blocks in the project according to the execution order. You can modify the execution order of Programs and Tasks in the Project Browser.
Programs are the proper choice for executing ladder logic instructions that takes multiple scans to complete (Fully Asynchronous and Multi-scan).
A Program code-block is required for ladder logic that will using any of the Stage Programming instructions. This includes Stage Programming instructions (JMP - Jump To Stage, JMPI - Indexed Jump, SG - Stage, SGRST - Disable Stage, SGRSTR - Disable Range of Stages, SGSET - Enable Stage, SGDIVRG - Jump to Multiple Stages, SGCONVRG - Converge Multiple Stages to SG and all of the Fully Asynchronous instructions that can be configured to Jump to a Stage when the instruction is done.
Tasks
A Task is the proper code-block choice for a section of ladder logic that will be executed multiple times and each execution will make a single pass through all of the ladder logic. A good example is ladder logic that will perform a complex calculation at a prescribed interval, or when an event occurs.
The programmer controls when Tasks are executed by using the Enable Task (ENTASK) instruction, which is configured to execute its Task either one time on the leading edge of the input logic, or to execute at a specific, recurring time interval as long as the input logic power-flow remains ON.
Note: it is important to know that when a Task is enabled this does NOT mean the Task begins running at that instant in time. Enabled means the Task will be executed when the CPU gets to it as the CPU works through the code-blocks in the project according to the execution order. You can modify the execution order of Programs and Tasks in the Project Browser.
Subroutines
Subroutines are code-blocks that are invoked through the Call Subroutine (CALL) instruction. The ladder logic in a Subroutine is executed at the point in time the Call instruction is executed, and all of the ladder logic in a subroutine is executed each time the subroutine is invoked. Subroutines are typically used when there is ladder logic that needs to be executed multiple times with a different set of input and / or output values each time it is executed.
Interrupt Service Routines
Interrupt Service Routines are only available in projects for PLCs that have hardware support for interrupts, for example the BRX CPUs.
An interrupt is a signal generated by some event external to the CPU, which causes the CPU to stop what it is doing (stop executing the code it is currently running) and jump to a separate piece of code designed by the programmer to deal with the event which generated the interrupt request. This interrupt handling code is called an ISR (interrupt service routine). When the ISR is finished, the CPU returns to the code that was running prior to the interrupt, which then resumes running with no awareness that it has been preempted by the interrupt code. It is this ability to run the appropriate code for an external event at any point in time that is both the chief benefit of, and the potential source of difficulties from, interrupts.
In the Do-more CPUs, an interrupt service routine (ISR) is a code-block, whose execution is triggered by the reception of an Interrupt Trigger, which is configured through the System Configuration or through the INTCONFIG - Interrupt Configuration Editor. Interrupt Triggers define the external hardware event or timed event that constitutes the Interrupt, and associates an Interrupt Service Routine (ISR) that will be executed when that Interrupt Trigger is fired.
Code-block Configuration Options
The Code-Block Configuration dialog is automatically opened each time a new Program, Task, Interrupt Service Routine, or Subroutine is created. The dialog can be manually opened when in Edit mode by right-clicking on a code-block in the Project Browser and selecting Configure Code-Block. Note: automatically opening this dialog can be enabled / disabled in Project Options. The dialog has the following configuration options:
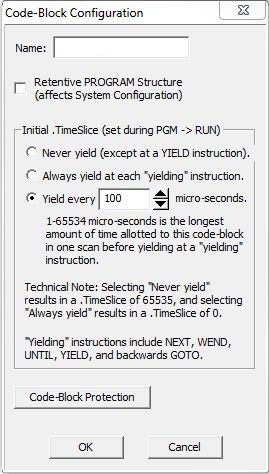
Name - the name of the code-block. Code-block names can be 1 to 16 characters in length and consist of any combination of alphanumeric characters and underscores ('_', 'a-z', 'A-Z', 0-9), no spaces or punctuation marks are allowed, and must begin with a letter or an underscore.
Retentive ( code-block-type )Structure (affects System Configuration) - enable this option to have the code-block's structure members maintain their values through a power-cycle; the most important of which are a Program's Stage bits which will be maintained through a power-cycle if the structure is marked as retentive.
By default, user created Program and Task structures code-blocks are
non-retentive and Interrupt structures are retentive. All of the system
(built-in) Programs and Tasks are retentive and that cannot be changed.
The one exception is that all Stages in $Main will be disabled and the
Initial Stage will be enabled if the CPU powers up in Run mode,
or on a Program -to- Run transition. Choosing to change the Retentive attribute will change the System Configuration.
Changes to the System Configuration can only be saved to the Do-more CPU
when it is in Program mode. Additional Run mode updates can not be performed
until these System Configuration changes have been saved to the CPU.
Note: this selection only affects what happens with the code-block structure after a power-up, or a restart after a Watchdog Timer event, or after a REBOOT instruction is executed. On a Program -to- Run mode change the state information for the code-block are reset even if this option is enabled. Refer to the discussion on $PgmModeRestart (ST15) for more information on the effects of making a code-block retentive.
Looping instructions in ladder logic (FOR / NEXT, WHILE / WEND, REPEAT / UNTIL, GOTO / LABEL) have the potential to cause problems during the CPU's scan, ranging from variations in the scan times to infinite loops. Do-more CPUs employ a mechanism - called 'yielding' - to manage this problem by allowing individual code-blocks to specify how much processor time per scan to allow looping instructions contained in those code-blocks to execute before they 'yield'. When a code-block yields it will suspend execution of a looping instruction during the current scan, and will begin executing the looping instruction on the next scan, taking up right where it yielded. The amount of time allotted for loop execution in a code-block is called the TimeSlice and the value is stored in the .TimeSlice field of each code-block's structure.
Initial .TimeSlice (set during PGM -> RUN) - the code-block's .TimeSlice value will be set to this Initial TimeSlice value every time the controller goes to Run mode. The TimeSlice value can be changed at runtime by modifying the .TimeSlice structure member.
-
Never Yield (except at YIELD instruction) - selecting this option will cause the code-block to run to completion. This selection will cause each loop to complete each time the code-block is executed. The only exception is if the code-block contains an explicit Yield Program or Task (YIELD) instruction. This selection will cause the loops to complete in the least amount of time possible, but has the most potential to vary the scan time. Selecting 'Never Yield' results in a .TimeSlice value of 65535.
-
Always Yield at each "yielding" instruction - selecting this option will cause the code-block to suspend execution on each scan at each yielding instruction in the code-block. "Yielding" instructions include Index by Step (NEXT), While End (WEND), Repeat Until Condition is Non-Zero (UNTIL), Go To Label (GOTO), and Yield Program or Task (YIELD). This selection will execute exactly one pass through each loop on each scan. Selecting 'Always Yield' results in a .TimeSlice value of 0.
-
Yield Every XXX microseconds - selecting this option will cause the code-block to execute the looping instructions for the user-specified amount of time, then yield once a yielding instruction is reached. This value can be any integer constant between 1 and 65534.
Code-Block Protection
These optional selections control accessibility and visibility of a code-block within Do-more Designer. The programmer can select to secure the contents of user-created code-blocks from being viewed and / or edited by means of a password and optionally encrypting the code-block contents. This dialog will show the current state of the protection and allow the programmer to set the protection level that will be enforced once the dialog is closed or the project is closed.
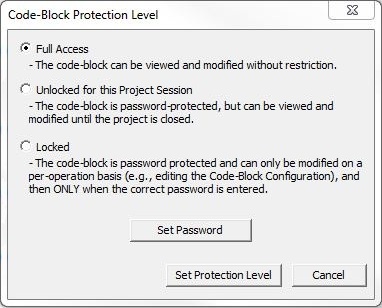
- Full Access
- (the default value) - the contents of the code-block can be viewed and
modified without restriction.
- Unlocked
for this Project Session - the code-block is password protected,
and once the password is correctly entered it's contents can be viewed
and modified. The code-block will be locked automatically after the project
session is closed.
- Locked
- the code-block name will be listed in the Control Logic group of the Project Browser, and placeholders
for each rung will be present, but the contents of the code-block
is password protected and can only be modified on a per-operation basis,
e.g. changing the code-block configuration, which requires entering the
correct password.
The code-block will be locked automatically after the Do-more Designer session is closed. The code-block will be displayed in the Project Browser with "(Locked)" appended to the code-block name. Any attempt to access a code-block that is locked will open a dialog that will prompt for the password.
The contents of code-blocks that are locked will not be accessible to the normal operations of the programming software, for example Search / Replace, Program Check, Compare Programs, etc. So, for obvious reasons, code-blocks should be unlocked during editing sessions and then locked only when the project session is about to be ended.
Set Password - click this button to open the Modify Code-Block Password dialog. Code-block passwords must be at least 4 characters in length, can be any reasonable length, and can contain any combination of letters, numbers, and characters. Once a password has been set for a code-block it is encrypted as part of the code-block.
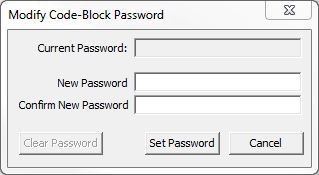
Current Password - will be disabled if no password currently exists, otherwise enter the current password for this code-block.
New Password - enter the new password for this code-block.
Confirm New Password - re-enter the password to confirm.
Click Clear Password to clear the existing password.
Click Set Password to save the new password. It is imperative that the programmer remember the code-block password. Once a password has been set for a code-block it is encrypted as part of the code-block, and therefore it will be impossible to retrieve a lost code-block password.
Click Cancel to exit without saving the new password.
Click Set Protection Level to save the protection level changes.
Click Cancel to exit without saving any protection level changes.
Predefined Programs and Tasks
Every Do-more Designer project contains a predefined Program code-block named $Main. The controller will automatically execute $Main on the transition from STOP to RUN, and will continue to execute $Main as long as the controller stays in RUN mode. Programmers that don't need (or want) to use multiple code-blocks in their project can put all of the ladder logic in this one code-block, and the project will operate similarly to a traditional, monolithic PLC program.
For programmers wanting to 'ease' into the modular programming approach, Do-more Designer provides some prebuilt system Tasks that are part of each project. Using these built-in system Tasks provides a way to easily segment a monolithic ladder logic program into logically manageable sections and can make a big difference in the readability and maintainability of a project.
The following system Tasks are automatically created with each new project, and are initially located in the Unused System Tasks group in the Project Browser. To begin using one of these system Tasks, simply double-click on that Task name in the Project Browser and it will be moved from the Unused group to the System Tasks group and the code-block will be opened in a Ladder View where it can be edited.
The following describes the function of each of these system Tasks:
$tFirstScan - this Task will execute one time on the scan when the controller transitions from STOP to RUN mode, it will be the ONLY code block that is executing on that scan
$tLastScan - this Task will execute one time on the scan when the controller transitions from RUN to STOP mode, it will be the ONLY code block that is executing on that scan
$tTopOfScan - this Task will be the first code-block to execute in each controller scan (except for the first and last scan). This is the proper code-block to place ladder logic that handles input operations like scaling analog input values, mapping real-world inputs to internal variables (Map Inputs and Outputs - MAPIO), and processing external protocol values (Translate to Do-more - SUBSCRIB)
$tBottomOfScan - this Task will be the last code-block to execute in each controller scan (except for the first and last scan). This is the proper code-block to place ladder logic that handles output operations like scaling analog output values, mapping internal variables to real-world outputs (Map Inputs and Outputs - MAPIO), and processing external protocol values (Translate from Do-more - PUBLISH).
The following time-driven system tasks do not start their execution at the specified interval, instead they will be automatically restarted at the specified interval AFTER the completion of all the ladder logic in the code-block.
$t1Second - after all of the ladder logic in this code block has executed it will automatically be scheduled to run again in 1 second.
$t100ms - after all of the ladder logic in this code block has executed, it will automatically be scheduled to run again in 100 milliseconds.
$t50ms - after all of the ladder logic in this code block has executed, it will automatically be scheduled to run again in 50 milliseconds.
Termination Scan:
The Program and Task code-blocks have termination logic that will execute when they stop running or are disabled respectively; Subroutines and Interrupt Service Routines do not have Termination logic. On the termination scan these code-blocks will run the termination logic for each individual instruction that is contained within the element, then it will run it's own termination logic.
Program - all of the Output Coil (OUT) instructions in the Program are turned OFF; all of the Timers and Counters in the Program are reset. If the Program contains Stage (SG) instructions then all of the Stages will be disabled.
Task - all of the Output Coil (OUT) instructions in the Task are turned OFF; all of the Timers and Counters in the Task are reset.
See Also:
EXIT - EXIT This Program or Task
RETC - Conditional Return Back to Call
INTCONFIG - Interrupt Configuration Editor
INTDECONFIG - Deconfigure Interrupt
INTSUSPEND - Suspend Interrupt
Related Topics:
Related Instruction Topics:
ENDC - Conditional End of Code Block
RESTART - Restart Program or Task
SUSPEND - Suspend Program or Task