Topic: DMD0145

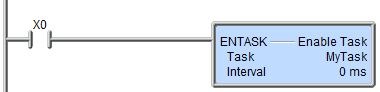
ENTASK - Enable Task
The Enable Task (ENTASK) instruction is used to enable a user-defined Task to run as part of the subsequent PLC scan. This instruction does NOT cause the CPU to immediately begin execution of the Task, rather it configures the Task to run when the CPU gets to it as part of its normal scan processing. If the Task exists later in the execution order the Task will begin execution on the same scan. If the Task exists earlier in the execution order the Task will begin execution on the subsequent scan.
By default, user-created Tasks will be executed in the order that they are added to the project. The execution order of the code-blocks in a project can be modified through the Project Browser.
Parameters:
Note: Use the F9 key or click the 'three dot box' at the right edge of the parameter field to open the Default Element Selection Tool (the Element Picker or the Element Browser) or use the Down-Arrow key (Auto-Complete) on any parameter field to see a complete list of the memory locations that are valid for that parameter of the instruction.
Task is the name of the Task to enable. This can be a Task that already exists, or follow the steps below to create a new Task code-block:
If a name was entered that is NOT an existing Task, this Create Task message box will be displayed. This could have happened because the Task name was misspelled, or because the programmer wants to create a new Task.
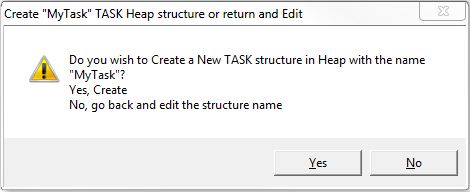
Click Yes to create a new Task data structure using the name provided in the Task field. This does NOT create the code-block, this is only the heap item that will contain the Task's data. The actual code-block can be created in the next step. Click No to return to the Editor for the ENTASK instruction so that a different name can be entered.
Note: choosing to create a new heap item will change the System Configuration. Changes to the System Configuration can only be saved to the CPU when it is in PROGRAM mode. Additional Run mode updates can not be performed until these System Configuration changes have been saved to the CPU.

Click Yes to create the code-block at this time. The associated code-block will be created and the Code-block Configuration dialog will then be displayed where the user can configure the runtime settings and the code-block protection. You can click No to create the code-block later, but the code-block for this Task must be created before the project can be downloaded to the CPU.
If an existing ENTASK instruction is being edited and the Task name is changed to a Task that does not exist, a different Create Task message box will be displayed. Again, this could have happened because the Task name was misspelled, or because the programmer wants to create a new Task.
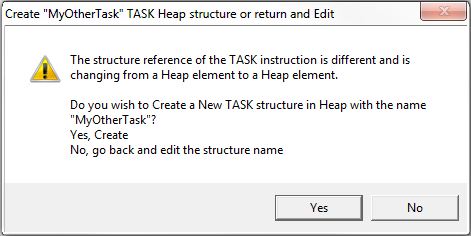
Click Yes to create a new Task using the name provided in the Task field. This does NOT create the code-block, this is only the heap item. The code-block can be created in the next step. Click No to return to the Editor for the ENTASK instruction so that a different name can be entered.
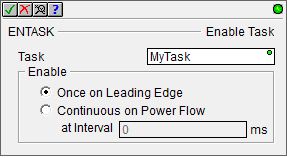
Enable specifies when and how often the Task will run:
- select Once on Leading Edge to have the Task run to completion exactly one time when the input logic transitions from OFF to ON. Depending
on the contents of the Task, this may take more than one PLC scan, but the entire Task will be executed then it will be disabled. Configured this way
the Enable Task instruction is Edge Triggered
 Each time the input logic transitions from OFF to ON this instruction will execute. With each execution, this instruction will run to completion even if the input logic transitions to OFF before the instruction completes. and will have a gray triangle at the right
end of the input leg to indicate this.
Each time the input logic transitions from OFF to ON this instruction will execute. With each execution, this instruction will run to completion even if the input logic transitions to OFF before the instruction completes. and will have a gray triangle at the right
end of the input leg to indicate this.

- select Continuous on Power Flow to have the Task run as long as the ENTASK instruction has power flow. Once the end of the Task is reached, it will remain enabled and execution will start over at the top of the Task.
at Interval - specifies how much time (in milliseconds) to wait before the Task is allowed to run. After the Task has run to completion, if the ENTASK instruction still has power flow, the Task will remain enabled and will wait the specified amount of time before running again. This can be any constant value between 0 and 2,147,483,647, or any readable numeric location. As long as the input logic remains ON, the value of 0ms means the Task will run again on the next scan.
As long as the input logic remains ON, the Task will run again when the Interval time is reached. When configured to run at an interval, the status display will display the Task's .IntervalAcc value that contains the amount of time (in milliseconds) before the Task will run again.

Note: during their termination scan, Tasks will run the termination logic for each individual instruction that is contained within the Task, then will run its own termination logic. All of the Output Coil (OUT) instructions, and any output coil in any instruction that has one as a parameter (for example TIMEPROP) are turned OFF. All of the Timers and Counters are reset. When Enable Task runs a Task one time, the termination logic is executed when the Task completes. When Enable Task runs a Task recurrently, the termination logic is executed when the ENTASK itself is disabled. The Task's associated structure will be initialized (clearing internal flags, counters, etc.) in preparation for being restarted.
See Also:
ENTASK - Enable Task
RESTART - Restart Program or Task
SUSPEND - Suspend Program or Task
Related Topics:
Overview of Code Blocks (Programs, Tasks, Subroutines and Interrupt Service Routines)
Using Interrupt Subroutines on BRX PLCs
Modifying the Execution Order of Programs and Tasks
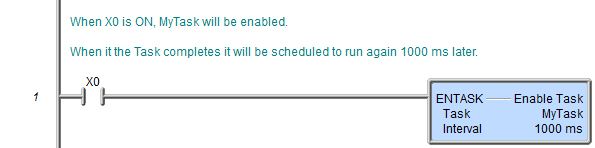
Rung Example: