Topic: DMD0379

Subroutines
Subroutines are code-blocks that are invoked through the Call Subroutine (CALL) instruction. The ladder logic in a Subroutine is executed at the point in time the Call instruction is executed, and all of the ladder logic in a subroutine is executed each time the subroutine is called. Subroutines are typically used when there is ladder logic that needs to be executed multiple times with a different set of input and / or output values each time it is executed.
Subroutines can be called recursively, that is, a Subroutine can execute another instance of itself from within that Subroutine. Subroutines can be nested up to 84 levels deep.
There is not a structure associated with a Subroutine like there are with other code-blocks.
One or more RETC - Conditional Return Back to Call instructions can be used in the ladder logic to exit based on the status of the input logic.
Each subroutine requires a RET - Return Back to Call instruction to be the last ladder logic instruction in the code block.
Warning: There is no Termination Logic for a Subroutine like there are with other code-blocks; any Output Coil that is turned ON inside a Subroutine will remain ON after the Subroutine ends.
Not All Instructions Allowed in Subroutines
Subroutines are state-less logic that behave like simple instructions. This means that any instruction that takes multiple scans to execute correctly will not work as expected in a subroutine. The ladder logic scan makes exactly one pass through all of the ladder logic in the Subroutine each time it is called. This has consequences for the following types of instructions:
Looping instructions can be used in the ladder logic of a Subroutine but there is no TimeSlice processing. This means that every iteration of the loop will be done during the one pass through the ladder logic in the Subroutine. The scan time will increase by the amount of time it takes to complete the Subroutine, and if the loop is sufficiently long, this can cause the Software Watchdog Timer to fire.
Edge-triggered inputs are not allowed in a Subroutine because edge-triggered inputs (like the inputs on Counters) need at least two PLC scans to operate properly (one scan to see the OFF state of the input and a second scan to see the ON state) but the PLC scan only makes one pass through all of the ladder logic in the Subroutine each time it is called.
Asynchronous instructions are not allowed in a Subroutine because asynchronous instructions always require more than one scan to operate properly and the PLC scan only makes one pass through the Subroutine's ladder logic when it is called.
Refer to the Instruction Set List which shows which instructions are NOT allowed with the  symbol.
Subroutine Code-Block Configuration
Any time a new Subroutine is created the following dialog will open where you will specify the operating parameters of the code-block that is associated with the Subroutine.
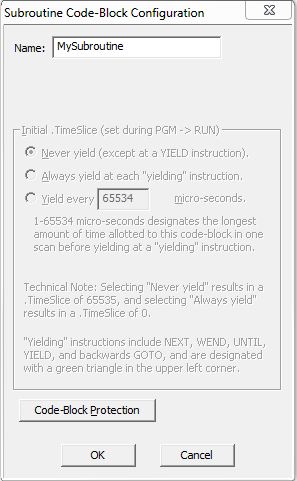
Name - the name of the code block that is executed when the Subroutine is called. The Subroutine name can be 1 to 16 characters in length and consist of any combination of alphanumeric characters and underscores ('_', 'a-z', 'A-Z', 0-9), no spaces or punctuation marks are allowed, and must begin with a letter or an underscore.
Notice the TimeSlice option is grayed out. This is because even though Subroutines allow the use of looping instructions (FOR / NEXT, WHILE / WEND, REPEAT / UNTIL, GOTO / LABEL) , those instructions will never yield; they always run to completion regardless of the .TimeSlice value of the calling Task or Program.
These optional selections control accessibility and visibility of a code-block within Do-more Designer. The programmer can select to secure the contents of user-created code-blocks from being viewed and / or edited by means of a password and optionally encrypting the code-block contents. This dialog will show the current state of the protection and allow the programmer to set the protection level that will be enforced once the dialog is closed or the project is closed.
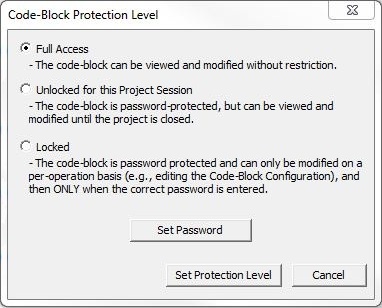
- Full Access
- (the default value) - the contents of the code-block can be viewed and
modified without restriction.
- Unlocked
for this Project Session - the code-block is password protected,
and once the password is correctly entered it's contents can be viewed
and modified. The code-block will be locked automatically after the project
session is closed.
- Locked
- the code-block name will be listed in the Control Logic group of the Project Browser, and placeholders
for each rung will be present, but the contents of the code-block
is password protected and can only be modified on a per-operation basis,
e.g. changing the code-block configuration, which requires entering the
correct password.
The code-block will be locked automatically after the Do-more Designer session is closed. The code-block will be displayed in the Project Browser with "(Locked)" appended to the code-block name. Any attempt to access a code-block that is locked will open a dialog that will prompt for the password.
The contents of code-blocks that are locked will not be accessible to the normal operations of the programming software, for example Search / Replace, Program Check, Compare Programs, etc. So, for obvious reasons, code-blocks should be unlocked during editing sessions and then locked only when the project session is about to be ended.
Set Password - click this button to open the Modify Code-Block Password dialog. Code-block passwords must be at least 4 characters in length, can be any reasonable length, and can contain any combination of letters, numbers, and characters. Once a password has been set for a code-block it is encrypted as part of the code-block.
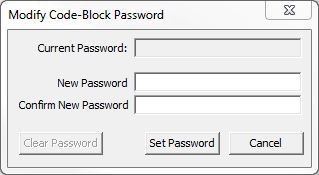
Current Password - will be disabled if no password currently exists, otherwise enter the current password for this code-block.
New Password - enter the new password for this code-block.
Confirm New Password - re-enter the password to confirm.
Click Clear Password to clear the existing password.
Click Set Password to save the new password. It is imperative that the programmer remember the code-block password. Once a password has been set for a code-block it is encrypted as part of the code-block, and therefore it will be impossible to retrieve a lost code-block password.
Click Cancel to exit without saving the new password.
Click Set Protection Level to save the protection level changes.
Click Cancel to exit without saving any protection level changes.
See Also:
EXIT - EXIT This Program or Task
RETC - Conditional Return Back to Call
INTCONFIG - Interrupt Configuration Editor
INTDECONFIG - Deconfigure Interrupt
INTSUSPEND - Suspend Interrupt
Related Topics:
Related Instruction Topics:
ENDC - Conditional End of Code Block
RESTART - Restart Program or Task
SUSPEND - Suspend Program or Task