Topic: DMD0552
![]()
CTRIO Module Configuration - Discrete Tables
Discrete Output Tables Overview:
To get to the CTRIO Module Configuration - Discrete Tables:
-
Follow this menu path: PLC --> System Configuration --> Module Configuration(s). This pulls up the System Configuration dialog.
-
Double-click on the CTRIO to configure. This pulls up the Edit CTRIO/CTRIO2 Configuration dialog.
-
Press the <Discrete Tables> button.
Each Discrete Table is a list of presets that directly manipulate a CTRIO discrete output based on a CTRIO input function. These tables must be loaded for a particular CTRIO output before they can be used. They can be used only with the following CTRIO output configuration:
And will only work in conjunction with the following CTRIO input configurations:
There are 2 types of discrete tables available:
-
Preset Table- a list of instructions that manipulates a discrete CTRIO output based on an input count or time. Click here for more details.
-
PLS (Programmable Limit Switch) - This is only available for CTRIO2. A list of limits that will be indicated by the state of a discrete CTRIO output based on an input count or time. Click here for more details.
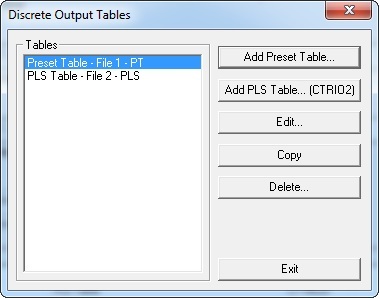
Tables box - This box lists all the discrete tables previously created.
To create a new preset table, click the <Add Preset Table> button.
To create a new PLS table, click the <Add PLS Table> button.
To edit an existing table, click on the table in the Tables box list and then click the <Edit> button.
To copy an existing table, click on the table to copy in the Tables box list and then click on the <Copy> button. An identical table will appear in the list.
To delete an existing table, click on the table to delete in the Tables box list and then click the <Delete> button.
Preset Tables:
Preset tables must be loaded for use in the Do-more ladder logic for a particular CTRIO output before they can be used. The following Do->more instructions are used in conjunction with preset tables:
-
CTTBLLD (CTRIO Load Table) - loads a particular preset table for use for a particular CTRIO output
-
CTTBLADD (CTRIO Add Entry to Preset Table) - allows an entry to be added to a loaded preset table, however, since this entry is done from the ladder logic, it is not permanent and cannot change the preset tables configured here in the system configuration
-
CTTBLCLR (CTRIO Clear Table) - allows a preset table to be "unloaded" or cleared from use with a particular CTRIO output.
-
CTTBLEDT (CTRIO Edit Preset Table Entry) - allows a particular entry in a loaded preset table to be changed, however, since this entry is done from ladder logic, it is not permanent and cannot change the preset tables configured here in the system configuration.
Once a particular preset table is loaded for use (i.e. via a CTTBLLD instruction), the table starts with the first step in the table and checks if that preset has been reached. If it has been reached already, it executes the command for the CTRIO output. If the CTRIO output is enabled, it will be turned OFF/ON according to that command. Regardless if the CTRIO output is enabled or not, the table proceeds to the next entry. Once the last entry has been executed, the CTRIO reports the table is finished by setting a bit in the CTRIO structure. CTRIO structures used for preset tables are, for example:
-
$CTRIO_000_Out0.EnableOutput - Output 0 enable output bit, must be set ON for the preset table command to affect the CTRIO output.
-
$CTRIO_000_Out0.OutputEnabled - Output 0 output enabled feedback bit, will be ON when the CTRIO output is enabled.
-
$CTRIO_000_Out0.TableComplete - Output 0 table complete bit, will be set ON when the preset table has completed it last entry.
The Edit Preset Table dialog is where a preset table is created and/or edited.
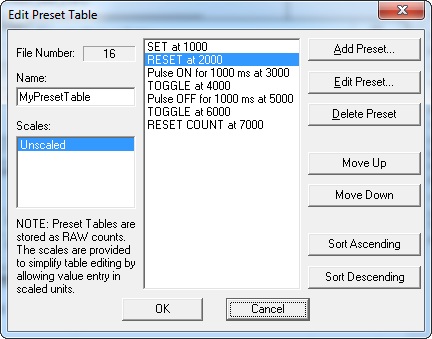
File Number - automatically assigned
Name - optional name for documentation purposes
Scales - If any scaling has been configured for the CTRIO input, these scales (engineering units) can be used instead of using the Unscaled (raw counts/times).
To add an entry to the preset table press the <Add Preset> button. This will pull up the Edit Preset Entry dialog (see below).
To edit an existing entry, click on that entry in the table and press the <Edit Preset> button. This will pull up the Edit Preset Entry dialog (see below).
To delete an existing entry, click on that entry in the table and press the <Delete Preset> button.
To move a particular entry up in the list, click on that entry in the table and press the <Move Up> button.
To move a particular entry down in the list, click on the entry in the table and press the <Move Down> button.
To sort the list according to preset values use the <Sort Ascending> or <Sort Descending> button.
The Edit Preset Entry dialog is where a particular preset table entry is created and/or edited.
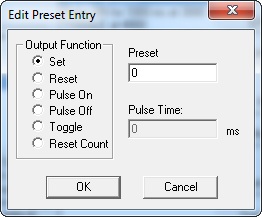
There are 6 basic functions available to control the CTRIO discrete output:
-
Set - when the Preset count or time value is reached the CTRIO output is set ON
-
Reset - when the Preset count or time value is reached the CTRIO output is reset OFF
-
Pulse On - when the Preset count or time value is reached the CTRIO output turns ON for the duration of the Pulse Time value
-
Pulse Off - when the Preset count or time value is reached the CTRIO output turns OFF for the duration of the Pulse Time value
-
Toggle - when the Presetcount or time value is reached the CTRIO output toggles states; if it was previously OFF, it turns ON, if it was previously ON, it turns OFF
-
Reset Count - when the Preset count or time value is reached the CTRIO input count or time value is reset to the reset value.
To create (or edit) an entry, pick one of the Output Functions from the box and enter a value for the Preset (and Pulse Time if necessary).
PLS Tables (CTRIO2 Only):
PLS (Programmable Limit Switch) tables must be loaded for use in the Do-more ladder logic for a particular CTRIO output before they can be used. The following Do-more instructions are used in conjunction with PLS tables:
-
CTTBLLD (CTRIO Load Table) - loads a particular PLS table for use for a particular CTRIO output
-
CTPLSADD (CTRIO2 Add Entry to PLS) - allows an entry to be added to a loaded PLS table, however, since this entry is done from the ladder logic, it is not permanent and cannot change the PLS tables configured here in the system configuration
-
CTPLSEDT (CTRIO2 Edit PLS Entry) - allows a particular entry in a loaded PLS table to be changed, however, since this entry is done from ladder logic, it is not permanent and cannot change the PLS tables configured here in the system configuration.
Once a particular PLS table is loaded for use (i.e. via a CTTBLLD instruction) then if the CTRIO output is enabled, it will be turned OFF/ON according to the settings in the table. CTRIO structures used for PLS tables are, for example:
-
$CTRIO_000_Out0.EnableOutput - Output 0 enable output bit, must be set ON for the PLS table entries to affect the CTRIO output.
-
$CTRIO_000_Out0.OutputEnabled - Output 0 output enabled feedback bit, will be ON when the CTRIO output is enabled.
The Edit PLS Table dialog is where a PLS table is created and/or edited.
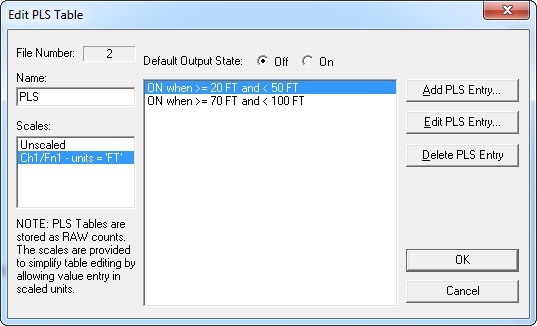
File Number - automatically assigned
Default Output State - sets the default behavior of the CTRIO output
Name - optional name for documentation purposes
Scales - If any scaling has been configured for the CTRIO input, these scales (engineering units) can be used instead of using the Unscaled (raw counts/times).
To add an entry to the PLS table press the <Add PLS Entry> button. This will pull up the Edit PLS Entry dialog (see below).
To edit an existing entry, click on that entry in the table and press the <Edit PLS Entry> button. This will pull up the Edit PLS Entry dialog (see below).
To delete an existing entry, click on that entry in the table and press the <Delete PLS Entry> button.
The list is automatically sorted according to the preset values entered.
The Edit PLS Entry dialog is where a particular PLS table entry is created and/or edited.
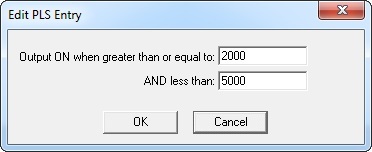
There are 2 entries to control the CTRIO discrete output:
-
Output ON [or OFF if the Default Output State is configured for ON] when greater than or equal to - when the CTRIO input count or time value has reached the value entered here the CTRIO output is set ON (or OFF if the Default Output State is configured for ON).
-
AND less than - when the CTRIO input count or time value is less than the value entered here the CTRIO output remains ON (or OFF if the Default Output State is configured for ON), but when it reaches this value the CTRIO output will go OFF (or ON if the Default Output State is configured for ON).
See Also:
Module Configuration for H2-CTRIO, H2-CTRIO2 or T1H-CTRIO
CTRIO / CTRIO2 Instructions
CTDYNPOS - CTRIO Run Dynamic Position Mode
CTDYNVEL
- CTRIO Run Dynamic Velocity Mode
CTPLSADD - CTRIO Add Entry to PLS
CTPLSEDT
- CTRIO Edit PLS Entry
CTREGWR -
CTRIO Write Register
CTRUNPOS - CTRIO Run Position Mode
CTRUNVEL
- CTRIO Run Velocity Mode
CTTBLADD - CTRIO Add Entry to Preset Table
CTTBLEDT
- CTRIO Edit Preset Table Entry
CTRIO2 Only Instructions
CTAXCFG - CTRIO2
Axis Configuration
CTAXDYNP - CTRIO2 Axis Run Dynamic Position Mode
CTAXDYNV
- CTRIO2 Axis Run Dynamic Velocity Mode
CTAXTRAP - CTRIO2 Axis Run Trapezoid
CTAXLIMT
- CTRIO2 Axis Run Trapezoid w/ Limits
CTAXJOG - CTRIO2 Axis Jog Mode
Related Topics: