Topic: DMD0424

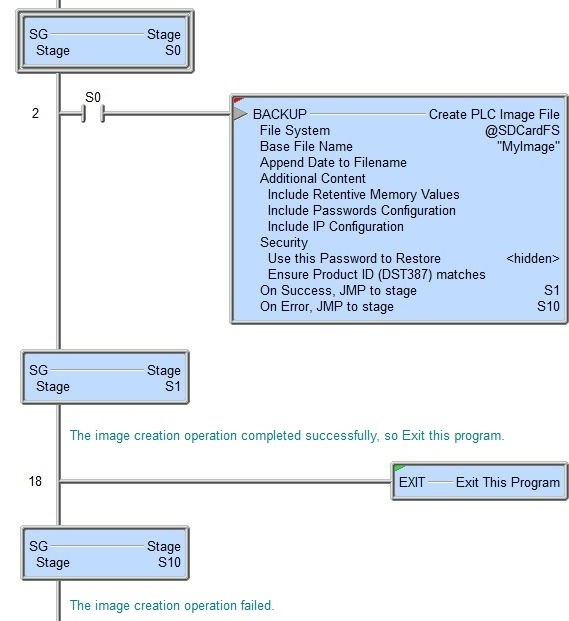
BACKUP - Create PLC Image File
Note: this instruction can only be used with a BRX CPU !
The Create PLC Image File (BACKUP) instruction is used to create an image file on one of the BRX PLC file system that contains some or all of the contents of the CPU. This image file can be restored to a BRX PLC from a micro-SD card.
Because of the potential to select large amount of data to add to the image file, this instruction will NOT run to completion in one PLC scan. The image creation process is broken into multiple file operations that will be executed on successive scans. While this instruction is running there will be an increase in the scan time during each scan required to complete the backup. One potential issue with processing the backup over multiple scans occurs if the contents of the PLC memory is changing while the backup operation is being processed. The image file will contain the memory values on whatever scan that section of memory was written to the image file. Simply said, the backup operation DOES NOT create a snapshot of the contents of the PLC at a given time. To minimize the impact we recommend that you execute the Create PLC Image File at a point when the memory contents of the PLC will not change until the completion of the instruction.
Note: Use the F9 key or click the 'three dot box' at the right edge of the parameter field to open the Default Element Selection Tool (the Element Picker or the Element Browser) or use the Down-Arrow key (Auto-Complete) on any parameter field to see a complete list of the memory locations that are valid for that parameter of the instruction.
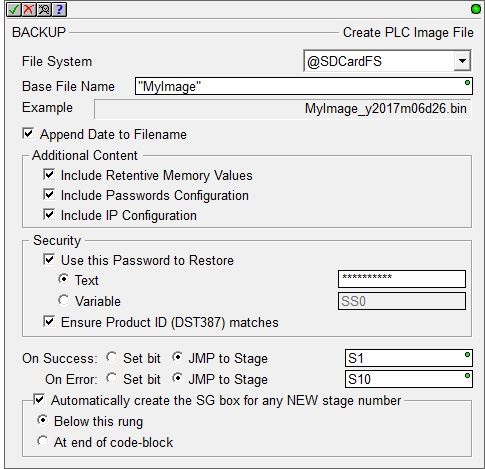
File System selects which of the available file systems to use:
@RamFS is the 1 MB file system in the Do-more CPU's system RAM. All Do-more CPUs will have this file system available.
@SDCardFS is the file system on the removable media installed in the micro-SD card slot (BRX only). This file system is automatically created when the removable media is inserted into the micro-SD card slot. The $SDCardFS.MediaInstalled and $SDCardFS.MediaMounted structure elements will be ON if there is a functional file system available on media in the micro-SD slot.
Note: All micro-SD media must be formatted in a PC before it can be used in a Do-more CPU. Only micro-SD media which has been formatted as FAT32 is supported. The file system can only access the first 32GB of storage space on the micro-SD media; any micro-SD card that is larger than 32GB must be reformatted to FAT32 before it can be used.
Base File Name is the name of the image file that will be created on the specified file system. The name can be text enclosed in double quotes or any system or user-defined string. The Base File Name allows a maximum length of 255 characters including spaces and non-alphanumeric characters, excluding the following characters which have special meaning to the file system * ? " : < > | . The Base File Name is not case sensitive.
If you intend to restore this image file from a micro-SD card on a BRX PLC the file must be named "image.bin" and be located in the root folder of the micro-SD card.
See the Backup and Restore from a microSD card help topic (DMD0425) for details on restoring from an image file.
Note: The Base File Name can include folder names.
Note: The ".bin" extension is automatically added to the text entered for the Base File Name.
If Append Date to Filename is checked the current date will be automatically appended to the specified Base File Name.
All images will contain the system configuration, all of the code-blocks, and documentation. Selections in the Additional Content group allow content from other areas of the PLC to be included in the image file.
Checking Include Retentive Memory Values will add all of the memory blocks and heap items (except the system's retentive DST and ST memory) that are marked as retentive to the image file.
Checking Include Passwords Configuration will add all of the configured passwords to the image file.
Checking Include IP Configuration will add all of the TCP/IP configuration to the image file.
NOTE: the Security options are intended for use by OEMs that are creating an image to update an existing PLC; they are typically not used if the image will be restored to a new, empty PLC. The optional security values that follow must be present in the target PLC before the image file can be restored.
The Security group has two selections that add security measures to the image file itself to make sure the image file is only restored to CPUs with the appropriate credentials. These options can help prevent unauthorized duplication of the intellectual property in these PLC systems.
Use this Password to Restore so that when this image file is restored to a CPU it will check the specified password against the PLC's Password Configuration to make sure it has sufficient privilege to write the contents of the image file to the CPU. The password can be any mix of printable characters from 4 to 32 characters (Do-more versions previous to 2.10 only allowed 4 to 8 character passwords). Writing the System Configuration, Program, and Documentation requires a user account with Write Project (WP) privilege. Writing the Retentive Memory requires a user account Write Data (WD) privilege.
- select Text to enter the password as text characters.
- select Variable if the password is already stored in a system-defined String or a user defined String.
Ensure Product ID (DST387) matcheswill include the current value in $ProductID (DST387) in the image. Before this image file can be restored to a CPU, the included Product ID will be checked to make sure that it matches the current value in the CPU in $ProductID (DST387) before the contents of the image will be restored to the CPU.
The On Success and On Error parameters specify what action to perform when this instruction completes. You do not have to use the same type of selection for both On Success and On Error.
If the Set Bit selection is used for either On Success or On Error, the specified BIT location will be SET OFF when the instruction is first enabled and will remain OFF until the instruction completes. Once complete, the appropriate Success or Error bit location ON. The specified Bit location is enabled with a SET (Latch) operation meaning that it will remain ON even if the input logic for the instruction goes OFF.
If the JMP to Stage selection is used for either On Success or On Error the target Stage must be in the same Program code-block as this instruction, you cannot specify a target Stage that exists in a different Program code-block. When the operation finishes, the target Stage will be enabled the same way as a standalone Jump to Stage (JMP) instruction would do it. The JMP to Stage option will only be available if this instruction is placed in a Program code-block.
On Success selects which of the following actions to perform if the operation is successful:
- Enable SET Bit then specify any writable bit location.
- Enable JMP to Stage then specify any
Stage number from S0 to S127 in the current Program code-block.
On Error selects which of
the following actions to perform if the operation is unsuccessful:
- Enable SET Bit then specify writable bit location.
- Enable JMP to Stage then specify any Stage number from S0 to S127 in the current Program code-block.
If either the On Success or On Error selections are set to JMP to Stage, Automatically create the SG box for any NEW stage number will be enabled which will automatically create any target stage that does not already exist.
- Below this rung will create the new target stage on a new rung following this instruction.
- At end of code-block will create the new target stage as the last rung of this Program.
See Also:
Backup and Restore using micro-SD Card (BRX-only)
BACKUP - Create PLC Image File
Related Topics:
Example: