Topic: DMD0240

Managing Project Documentation
Project documentation refers to all of the user-supplied text that is associated with a Do-more Designer project. There are five areas of a project that can be documented by the programmer: Element Documentation (Nickname, Extra info, Description), Rung Comments, the Title Page, the Project Properties Page, and the User Document. Each of the areas has it's own editing facility that enforces any rules that the areas have.
All of this documentation is an integral part of a project, so when a project is saved to the CPU, a copy of all of the project documentation is saved to the CPU as well. The CPU now contains a copy of the project documentation in addition to the ladder program and the system configuration data. Because the documentation is part of a project, any time the programmer adds any new project documentation or edits any existing project documentation, both the Write to Disk and Save to PLC icons on the online toolbar will become enabled.
Enabling Documentation Display on the Options Dialog
The Ladder tab of the Options dialog allows the programmer control over which of the individual areas of documentation will be displayed in each view. The Options dialog is opened through the View -> Options menu selection, the ’Options’ button on the Offline toolbar, or right-clicking in a Ladder View and selecting 'Options...' from the pop-up menu.
Once the Options dialog is open select the Ladder tab to get to the Documentation selections.
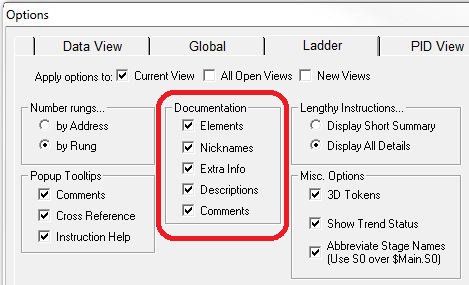
The Apply Options to selections at the top specify which Data views the changes to the options will be applied to.
Current View : the changes apply only to the currently selected Ladder View.
All Open Views : the changes apply to all of the currently open Ladder Views.
New Views : the changes do not apply to the currently selected Ladder Views, only to Ladder Views that are opened from this point forward.
The Documentation group of the Ladder Options dialog has entries for each type of documentation.
Elements :display the element name.
Nicknames : display the Nickname for any element that has one.
Extra Info : display the Extra Info for any element that has this information.
Description : display the Description for any element that has this information.
Comments : display the Rung Comments for any rung that has one.
The Documentation group of the Ladder tab currently shows all of the documentation types checked, meaning they will be displayed in the Ladder view. Leaving a selection checked turns ON that documentation type to be shown in the view. Unchecking the documentation type will turn it OFF in the any view that can display element documentation.
Note: the "Ctrl + /" key combination will temporarily toggle the display of all project documentation in a Ladder View.
Element Documentation
The individual memory locations that are used in instructions in the ladder logic are the most commonly documented items of a project. There are three pieces of documentation that can be added to any Element in a ladder logic program, they are: the Nickname, Extra Info and the Description. The Documentation Editor is opened for a particular programming Element by placing the edit cursor on that Element and doing one of the following:
Pressing Ctrl+D.
Selecting Tools -> Documentation Editor from the menu.
Right-Click with the and select Documentation Editor.
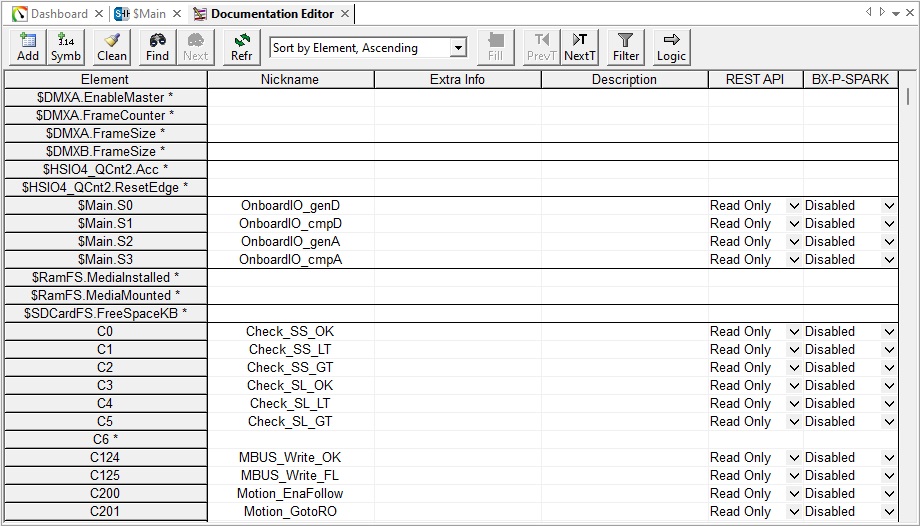
Nicknames
A Nickname is a user-created, alternate name for an Element in the controller (other applications you’re familiar with may use the term ”Tags” instead of Nickname). Because Element references can sometimes be cryptic, Nicknames are created by the programmer to give a human-readable, and more easily remembered name to an element in the controller. Once a Nickname has been assigned to an Element, the Nickname can be used interchangeably with the controller element within Do-more Designer.
Nickname Naming Conventions
All Element references in the controller are unique, that is, there
are no duplicate Element references. And since Nicknames directly correspond
to these unique elements in the controller, Nicknames themselves must
also be unique within a project. This means that there are rules the programmer
must follow in creating Nicknames. These rules are as follows:
-
Nicknames can be 1 to 16 characters in length.
-
Nicknames must begin with an alphabetic character or an underscore. For example, _1stPUMP is a valid nickname, but 1stPUMP is not a valid Nickname.
-
Nicknames can consist of any combination of alphanumeric characters and underscores ('_', 'a-z', 'A-Z', 0-9), no spaces or punctuation marks are allowed.
Extra Info
The Extra Info field is a 16 character field that has historically been used to identify panel wiring for the project. Text in the Extra Info field can consist of any alphabetic character, alphanumeric value, punctuation mark, and arithmetic operator.
Description
The Description field is a 132 character field that can be used to provide a detailed description of the element. Text in the Description field can consist of any alphabetic character, alphanumeric value, punctuation mark, and arithmetic operator.
See the Help Topic for the Element Documentation Editor for more information about creating and editing Element Documentation.
Using the Element Selection Tool to Enter Documentation
Although the Element Documentation Editor is the primary tool for creating and / or editing element documentation. documentation for an Element can also be managed through the Element Browser. The Element Browser is opened by the pressing the F9 key which will opens the user's choice of the Element Browser or the Element Picker.
In Do-more Designer versions 1.4 and later, the Element Picker is the preferred element selection tool, meaning that it that will be opened anytime the edit cursor moves to an editable parameter in ans instruction, or any time the F9 key is pressed when the instruction editor cursor is on an editable parameter. For those who would prefer to use the Element Browser, you can change this selection in the Ladder View tab of the Global Options dialog.
Element Picker
Using the Element Picker is a similar experience to the Element Browser
Element Picker dialog will automatically open and display all of the programming Elements that are valid for that parameter. The programming Elements will be displayed on the dialog in the Element Picker in the following two forms:
- A tree control with notations similar to the ones found in the Project Browser. This makes it very easy to browse through all of the possible programming elements for each instruction parameter.
- A grid that shows which Elements adjacent to the selected Element are already used in the project.
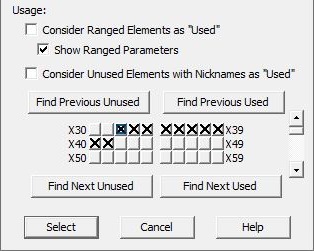
The top portion of the Element Picker contains the tree control that is used to browse through the various programming elements that are available for the parameter.
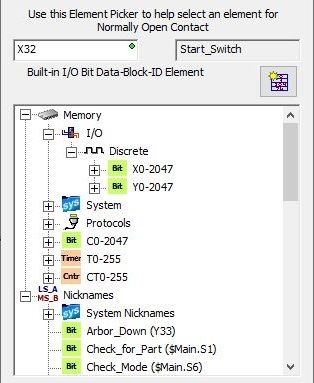
The bottom portion shows a Usage table, where the range of programming Elements that are adjacent to the one selected are shown as either Used (having an X) or Unused (no X).
Element Browser
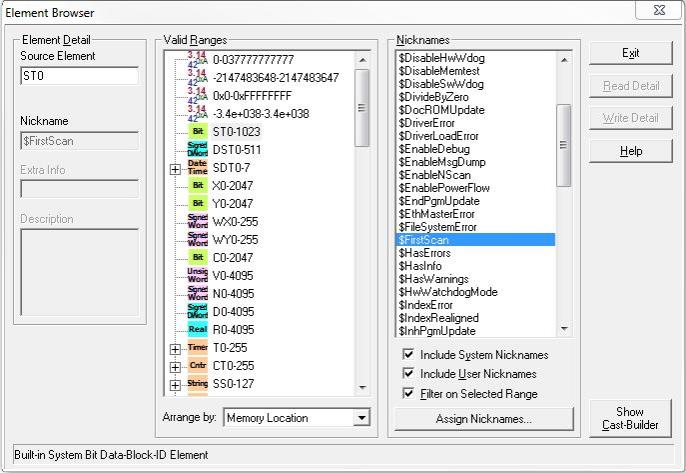
To use the Element Browser to manage the documentation for an Element, enter the desired Element in the Source Element field, then enter the Nickname, Extra Info, and/or Description text in the appropriate fields then click the Write Detail button to save the documentation for that Element.
If the edit cursor is over an Element in the ladder program when the Element Browser is invoked, that Element will be selected and any existing documentation will be preloaded when the browser is displayed. For example, if the edit cursor is over the Element X40 in the ladder program when you invoke the Element Browser, X40 will be displayed in the browser and any existing documentation will be loaded.
When editing an Element that has existing documentation, as soon as any of the documentation is changed the Read Detail button will be enabled. This button will reset the text in all of the fields back to the last version of documentation written to disk.
Selecting any of the items in the Nicknames list will display all of the existing documentation for that element and allow you to change that documentation.
The option to ’Include System Nicknames’ is enabled by default. If you want to exclude the predefined system Nicknames, uncheck this option and the resulting list will only display the user-assigned Nicknames in the currently opened project.
See the Help topic for the Element Browser for a complete discussion of using the Element Browser to manage Element Documentation.
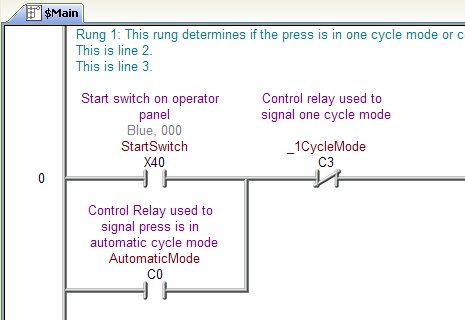
Adding Rung Comments
Each rung of ladder logic in a Program or Task can have a text Comment associated with it. The rung comment editor is used to create and edit these comments. Text for the rung comment can be entered directly into the comment field, or the programmer can use cut and paste from another comment or another editor.
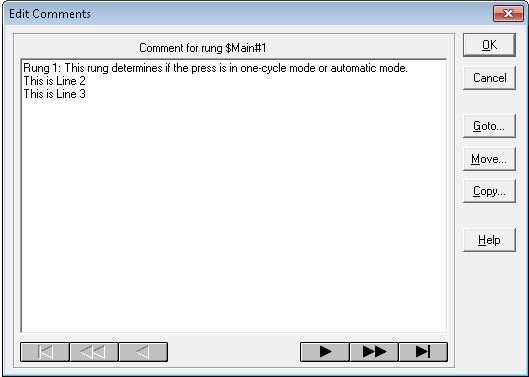
Each rung comment can contain up to 20 lines of text, with a maximum of 2400 characters. The number of characters per line will depend on the font and the width of the characters. Text in the rung Comment can consist of any alphabetic character, alphanumeric value, punctuation mark, and arithmetic operator; essentially any printable ASCII character can be used.
The Edit Comments dialog provides a free-form edit window. This allows the programmer to enter the comment text any way they want, within the confines of the edit window. All the traditional Windows editing keystrokes are available for editing, and for cutting and pasting text into and out of the comment editor.
See the Help topic for the Rung Comment Editor for a complete discussion of using the Comment editor to manage Rung Comments.
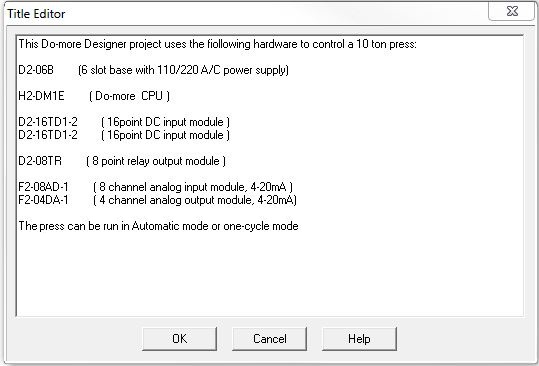
Title Page
The Title Page provides an additional way the programmer can document a Do-more Designer project. The Title page will be the first page when the project is printed. Whereas Element Documentation contains information about the individual program elements, and a Rung Comment contains information about an entire rung of ladder logic, the Title Page typically contains an overview of the whole project.
The Title Page can contain up to 20 lines of text, with a maximum of 2400 characters. The number of characters per line will depend on the font and the width of the characters. Text in the Title Page can consist of any alphabetic character, alphanumeric value, punctuation mark, and arithmetic operator; essentially any printable ASCII character can be used. See the Help topic for the Title Page Editor for a complete discussion of using that editor to manage the contents of the Title Page.
Project Properties Page
The File Properties Page dialog provides an additional way the programmer can document a Do-more Designer project. The information entered on the Properties page will be displayed on the Title Page. The Properties Page dialog is automatically opened the first time a project is saved to disk, and can be re-opened any time by selecting File -> Properties from the Offline toolbar.
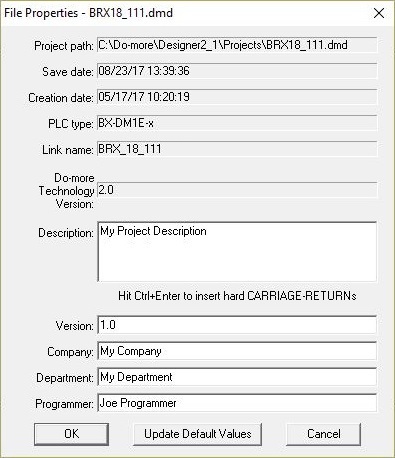
The information for the Project Path, Save Date, Creation Date, PLC Type, Link Name and the Do-more Technology Version are read from the copy of the project that is stored on disk. The information for the Company, Department, and Programmer are loaded from the Project's saved defaults. To change these default values, update the text in these fields then click Update Default Values.Enter new text for the Description and Version then click Ok to save the properties values.
Printing of the Project Properties
The default project configuration will include the information on the Project Properties Page with the text from the Title page, meaning that any time the project is printed the Title Page will also be printed which will include the Project Properties information. To disable the Printing of the Project Properties Page, uncheck the ’Print it!’ option on the Print / Print Preview, or Print All dialogs.
Attach a User Document
Do-more Designer projects can be configured to display a file (called the User Document) in place of the default Start Page content. You can use the same User Document for all Do-more Designer projects, or specify a unique User Document for each project.
To setup a Global User Document use the Startup Options selection of the Global Options dialog:
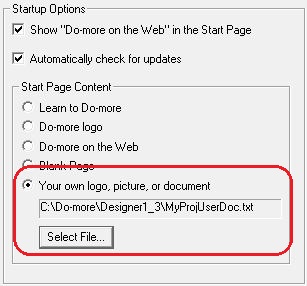
Start
Page Content - determines what is displayed in the lower section
-
Learn to Do-more - (the default) contains links to help topics that are made specifically to help the New -to- Do-more programmers get up to speed quickly with the hardware and software. These topics provide information about where the commonly needed resources are located in the controllers and what tools are available to the programmer. Everyone new to Do-more Designer and Do-more controllers will benefit from spending a few minutes reading through the information contained here.
-
Do-more logo - will display a picture of the Do>more! Logo
-
Do-more On the Web- (default) - will display content retrieved from the 'Do-more on the Web' home page
-
Blank Page - will display an empty gray background with no image
-
Your own logo, picture, or document - this can be any file type that can be displayed in a web browser, such as a text file (.txt), a web file (.html), a PDF document (.pdf), a Microsoft Word document (.doc / .docx), a picture (.jpg, .bmp, .gif, .tif, .png), etc.. The size of the user document is limited to a maximum of 10 megabytes.
Select File... will open the standard file open dialog to browse to the file that will be used as the User document.A confirmation dialog will be displayed, and once confirmed, the selected document will be displayed on the Start Page.
You can also attach an existing file to an open project as the User Document by selecting Tools-> Attach User Document... from the menu. This dialog appears:
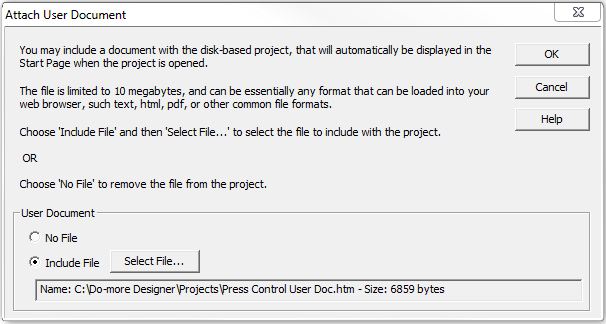
Selecting No File will remove the association to an existing User Document.
Select Include File
Click the Select File... button which will open the standard file open dialog to browse to the file that will be used as the User document. A confirmation dialog will be displayed, and once confirmed, the document will be displayed on the Start Page.
A global User Document can be set through the Start Page Content selection of the Global Options dialog, refer to the Start Page help topic for more information.
See Also:
Related Topics:
Importing
Element Documentation
Exporting Element Documentation