Topic: DMD0276

Element Documentation Editor
The Element Documentation Editor is used to manage the user-assigned documentation for the programming elements used in a Do-more Designer project. The Documentation Editor can be opened by selecting the Tools -> Documentation Editor menu selection, clicking the Documentation button on the Tools toolbar, or pressing Ctrl + D. If the edit cursor is over a programming element, the Documentation Editor will open with it's editor on that programming element.
The Element Documentation Editor also allows for the creation of symbolic constants for use in the project. These are constant values - values that do not change throughout the program execution - represented by some text. Rather than embed literal values in program logic, the use of appropriately named symbolic constants can clarify the intent of the code. In addition, if a specific value needs to be changed, reassigning a symbolic constant once is more efficient and less error prone than replacing every instance of the value.
Note: multiple instances of the Documentation Editor can be opened using Window -> New Window. Doing so allows each view to be oriented to a specific aspect of the Element documentation, for example using the Sort, and Filter to functions to display differing subsets of the documentation.
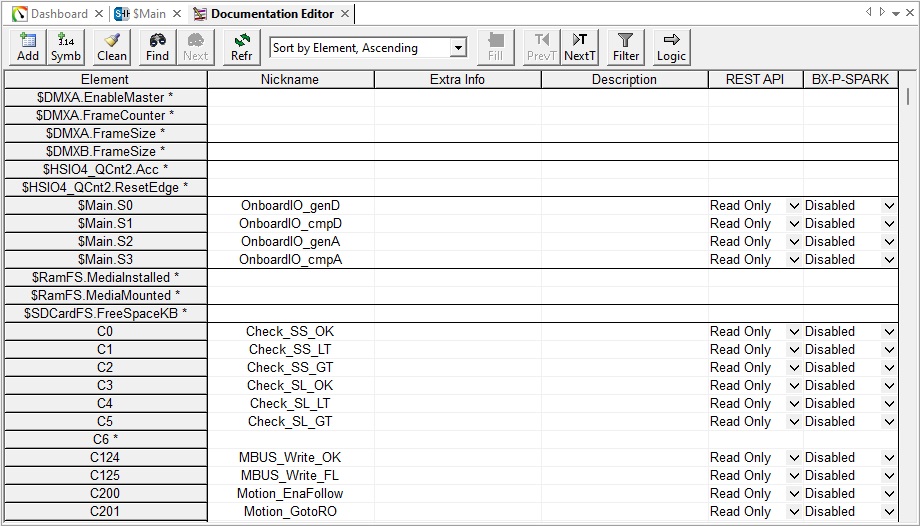
The user-assigned documentation for an Element is stored as a database record with the following fields:
Element
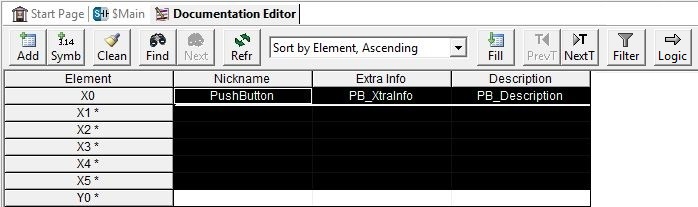
The program element. As program elements are added to a project a documentation record is automatically created for that element. An asterisk " * " beside a program element indicates one of the following:
The program element is currently in the project but does not have any user-assigned documentation
The program element was used during the current edit session at it may or may not still exist in the project - elements NOT used in the project will go away when the project is closed
Add Record was used to create a record but a program element was not specified, only the nickname was specified. The Element column will display "Unreferenced BIT, or Unreferenced WORD, etc. This column displays 'Symbolic Const' for all symbolic constants.
Nickname
A Nickname is a user-created, alternate name for an Element in the project (other applications may use the term ”Tags” instead of Nickname). Because Element references can sometimes be cryptic, Nicknames are created by the programmer to give a human-readable, and more easily remembered name to an element in the project. Once a Nickname has been assigned to an Element, the Nickname can be used interchangeably with the element within Do-more Designer.
All Element references in the project are unique, that is, there are no duplicate Element references. And since Nicknames directly correspond to these unique elements in the project, Nicknames must also be unique within a project. Nicknames can be 1 to 16 characters in length and consist of any combination of alphanumeric characters and underscores ('_', 'a-z', 'A-Z', 0-9), spaces will automatically be replaced with underscores, no punctuation marks are allowed, and must begin with a letter or an underscore.
The Nickname field will display the name of a symbolic constant. Symbolic constant names must follow the same guidelines as Nicknames.
Extra Info
The Extra Info field is a 16 character field. For programming elements this field can be used to identify panel wiring for the project. Text in the Extra Info field can consist of any alphabetic character, alphanumeric value, punctuation mark, and arithmetic operator.
For Symbolic constants the Extra Info field will contain the constant value.
Description
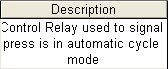
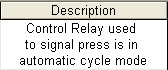
The Description field is a 132 character field that can be used to provide a detailed description of the element. Text in the Description field can consist of any alphabetic character, alphanumeric value, punctuation mark, and arithmetic operator. If the text for the Description is longer than the column width line breaks will be automatically inserted as necessary to make the Description fit within the column width. The editor allows for the manual addition of line breaks (CTRL + CR) within the Description text to control the formatting of the multi-line Descriptions. The Description can be one to six lines of text. The text in each line will be centered over the Element.
The following Description has the automatically inserted line breaks:
Here is the same Description with a manually entered line break after the word ’used’ and another after the word ’in’:
Memory Access Settings
The columns at the right edge of the dialog control whether the element is accessible through the column's communication device. The default configuration for any of these access methods is Disabled. Only elements that have been assigned a Nickname can be selected to allow external access, and you must select an access method for each element.
REST API is used by the on-board web server to allow access through HTTP protocol. The REST API
Ethernet-equipped BRX CPUs contain an HTTP-based RESTful API (REpresentational State Transfer, Application Programming Interface) that will return the contents of PLC memory locations in JSON formatted records. The REST API is accessed by a web browser using a URL with the appropriate parameters. does not allow writes to internal elements, so the only selections are Disabled and Read Only.
BX-P-SPARK is used by the SparkplugTM B POM (BX-P-SPARK). The selections are Disabled, Read Only, and Read / Write.
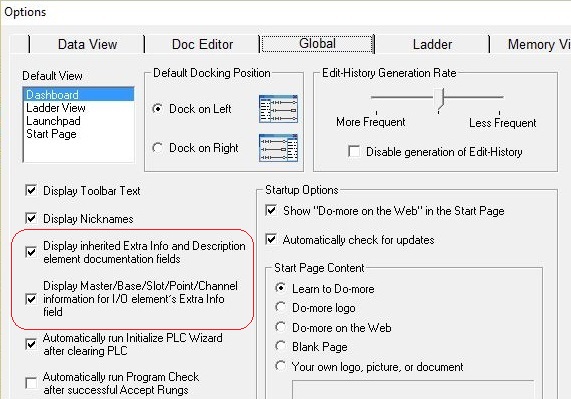
Inherited Documentation for Extra Info and Description
As of version 2.2, Do-more Designer has the ability to inherit the contents of the Extra Info and Description fields - for display purposes only - of structure field members from the base structure. For example if Timer T1 has Extra Info or a Description, references to T1.Acc will inherit T1’s Extra Info and Description fields only if the Extra Info and Description fields of T1.Acc are empty. This same process works for casts as well. They will inherit the Extra Info and Description fields from the base element. For example if D0 has Extra Info or a Description, the cast operation D0:B0 will inherit the Extra Info and Description from D0.
Additionally, if the Extra Info field for physical I/O points that actually exist in the system (X, Y, WX, WY, RX, RY) is empty, it will automatically be filled with text that describes the I/O point's location in the system using the following Master / Base / Slot / Point scheme:
For I/O points in the local base, the term Local is shown. Otherwise, Master / Base is shown as “1:0” (Master 1, Base 0).
The Slot value is shown as “Sn”, (“S3” for Slot 3).
Discrete input and output points are shown as “iPTn” or “oPTn” where n is 0-based, for example, “iPT4” is the 5th input point for that slot; “oPT0” is the first output point.
Analog input and output channels are shown as “iCHn” or “oCHn” where n is 1-based, for example, “iCH1” is the first input channel for that slot; “oCH7” is the 7th output channel.

Note: this option only generates text for the Extra Info field if the I/O point physically exists; it doesn't do so for I/O points that are allocated but not used. I/O points are allocated on a byte boundary, but a 4 in / 4 out combo modules will only use the first 4 of the 8 allocated input addresses and the first 4 of the 8 allocated output addresses; the remaining 4 inputs and outputs are unused. This function will only generate Extra info text for the 4 inputs and 4 outputs that actually exist.
The text for the Extra Info and Description fields is only generated when the element is being displayed in a Ladder View, Data View, Trend View, etc.; the contents are NOT written to the Documentation database for the elements. You can disable these functions with the appropriate selections on the Global tab of the View -> Options dialog. See below.
Adding Documentation for an Element
Entering documentation for any of the fields for a programming element or a symbolic constant is done by navigating to a field and beginning to type, or double-clicking on the field. If the field already contains documentation text, pressing the F2 key will edit the existing text.
The data entered in a field will be saved as soon as the text cursor is moved off of that field. Pressing the ESC will leave the field editor without saving any changes that have been made to the contents of that field.
Add will open the Add Documentation Record dialog to create a virtual documentation record for a programming element that is NOT currently being used in the project. As stated before, any elements used in the project will have a documentation record created automatically. The primary use for the Add Record dialog is bulk creation of element documentation records before they are used in the ladder logic. For example, many programmers will start with a P & I diagram that has the I/O points labeled and will use those labels as Nicknames. The Add Record dialog allows the programmer to quickly create documentation records with all of the Nicknames before the programming elements they reference are added to the ladder logic.

When in Single Record Mode, enter the values for the Element, Nickname, Extra Info, and Description as desired then click Add Record to create the new database record. The Element field will auto-increment to the next element in the same block.
Range Mode is used to create a virtual record for each element between the Start Element and the End Element. The Start Element and End Element must be in the same range. Any elements within the specified range that already have documentation records will not be changed.
Keep record content and increment nickname after "Add Record" - if you need to create multiple Nicknames that are sequentially numbered, check this box to retain the nickname text after the Add Record function is processed, then add an incrementing number to the end of the nickname and move to the next Element. For example: If you need to create Nicknames for 5 successive elements WX0 - WX4 and they are named MySensor1 through MySensor5, then Enter WX0 and MySensor1 in the Element and Nickname fields respectively. After clicking Add Record, the Element will auto-increment to WX1 and the Nickname will auto-increment to MySensor2. Click Add Record again and the Element will auto-increment to WX2 and the Nickname will auto-increment to MySensor3.
Symb will open the Add Symbolic Constant dialog to create a symbolic constant that is NOT currently being used in the project. As stated before, any symbolic constants used in the project will have a documentation record created automatically, the primary use for the Add Symbolic Constant dialog is bulk creation of these constants before they are used in the ladder logic.
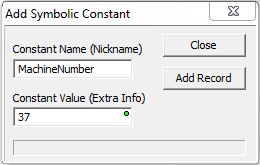
Enter the values for the Constant Name, and the Constant Value as desired then click Add Record to create the new database record.
Clean will open the Clean Documentation Database dialog that is used to remove documentation database records for programming elements and symbolic constants that are NOT used in the project.
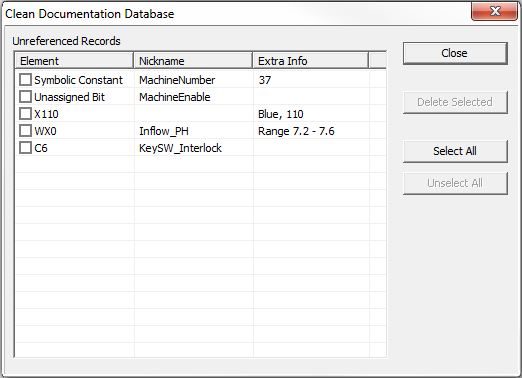
Select the Element, or Elements to remove then click Delete Selected to remove the documentation record for each element selected.
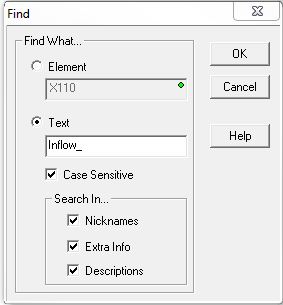
Find / Next will open the Find dialog to search through the documentation database for the selected item.
-
Element is the programming element ( D0, V0, R17, etc. ) or symbolic constant to search for.
-
Text is the text to search for.
If Case Sensitive is checked, case must match in the text search.
Search in selects which documentation fields to search in: Nicknames, Extra Info, and /or Descriptions.
Refr will manually refresh the list of elements using the Sort Order specified below.
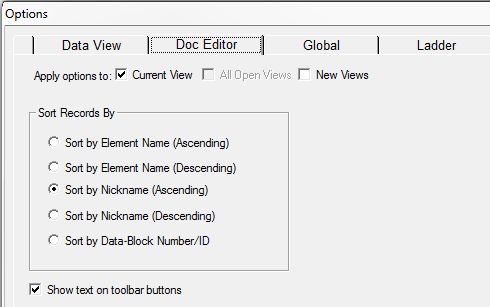
Sort Order selects one of the following options from the drop-down to specify how the list of elements will be organized:
Sort By Element, Ascending will organize the list alphabetically by the contents of the Element field.
Sort By Element, Descending will organize the list alphabetically in reverse order by the contents of the Element field.
Sort By Nickname, Ascending will organize the list alphabetically by the contents of the Nickname field.
Sort By Nickname, Descending will organize the list alphabetically in reverse order by the contents of the Nickname field.
Sort By Data-Block / Number ID will organize the list alphabetically by the Data-Block type and ID in the order they appear in the Memory Configuration.
Note: the Sort Order can also be specified in the View -> Options -> Doc Editor.
Previous Type will move the display so the previous Element type in the list is displayed.
Next Type will move the display so the next Element type in the list is displayed.
Fill (Fill Down Documentation Records)
Fill Documentation Records will use the contents of an existing Element's Nickname as a template and creates new Nicknames for consecutive Elements by appending an incrementing number (starting at 2) to the end of each new Nickname, for example: PushButton becomes PushButton2, PushButton3, PushButton4, etc. Each Fill operation can create auto-incremented Nicknames for up to 100 consecutive Elements.
The Fill operation works in the either Range mode or Selection mode. The mode is determined by how many Elements are selected in the Documentation Editor grid:
Range Mode
Begin by selecting only one source Element. You must select the Nickname field and you can optionally include the Extra info and / or Description fields. Note the following restrictions in Range mode:
The Fill operation can be used for structures, but not for individual structure fields, for example, you can use T0, but you cannot use T0.Acc.
The Fill operation can not be used for Symbolic Constants.
The Fill operation can not be used for Elements that have size casts (:B, :W, :D), but it can be used for Elements that have format casts (:U, :S, :R).

Click the Fill button to open the Ranged Mode dialog shown below:
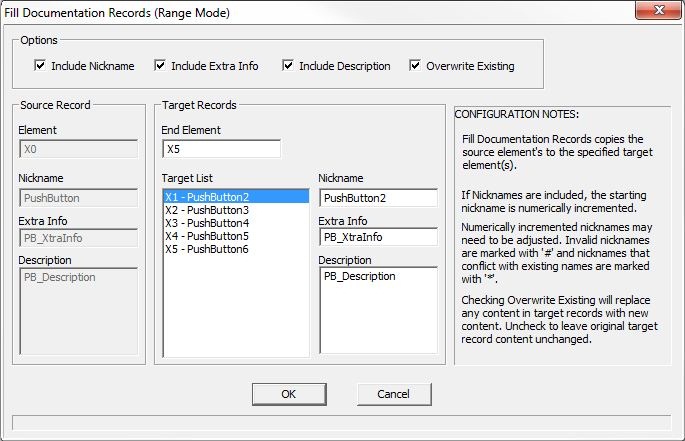
Options selects which documentation fields to include in the Fill operation:
If Include Nickname is selected, a number from 2 through the number of selected Elements is appended to the end of the source Nickname.
If Include Extra info is selected, the contents of the Extra Info field of the source Element are copied to the Extra Info field of the selected Elements.
If Include Description is selected, the contents of the Description field of the source Element are copied to the Description field of the selected Elements.
If Overwrite Existing is selected, the New Records will replace the Nickname, Extra Info, and / or Description of the Elements in the range. If disabled, Elements that contain Nickname, Extra info and / or Description information will NOT be replaced by the New Record information.
Source Record shows the Element that will be used as the template and its documentation record (Nickname, Extra Info, Description).
Target Records shows the Elements included in the Fill operation and the results of auto-incrementing the Nickname and copying the Extra Info and Description text. The contents of these three fields can be manually edited if required.
End Element is the last Element you want to use in the Fill operation. You can fill up to 100 records per fill operation.
Target List shows the currently configured list of Elements (Source Element -> End Element) with their auto-incremented Nicknames.
Take note of the Nicknames listed in this section for any that are bounded by pounds signs or asterisks as this means the Nickname has a problem that must be resolved before the Fill operation can be performed:
Nicknames that are bounded by pound signs # <Nickname> # are invalid for some reason. Nicknames can be 1 to 16 characters in length and consist of any combination of alphanumeric characters and underscores ('_', 'a-z', 'A-Z', 0-9), spaces will automatically be replaced with underscores, no punctuation marks are allowed, and must begin with a letter or an underscore. All of these must be resolved before the Fill operation can be performed.
Nicknames bounded by asterisks * <Nickname> * indicate they are in conflict with other Nicknames, the most likely cause of the problem is that they are duplicates. All of these must be resolved before the Fill operation can be performed.
Nickname is the source Element's Nickname with an auto-incremented number appended to the end.
Extra Info is a copy of the source Element's Extra Info text (if selected, and if it exists).
Description is a copy of the source Element's Description text (if selected, and if it exists).
OK will perform the Fill operation. This will only be available to select if there are no Invalid Nicknames and no Name Conflicts. Cancel will abort the Fill operation and close the dialog.
Selection Mode:
Begin by selecting the source Element and the range of elements to fill using a click-drag operation with the mouse or the shift-arrow keys. You must include the Nickname field in the selection, and you can optionally include the Extra info and / or Description fields in the selection. You must select at least two Elements to use the Selection Mode.
Note: the Fill operation can not be used for Symbolic Constants.
Note: If the Elements you want to select for the Fill operation are NOT shown in the database, use Add Record to add the desired entries to the database then they can be selected for the Fill operation.
After including all of the Elements for use in the Fill operation click the Fill button, which will open the Selection Mode dialog shown below:
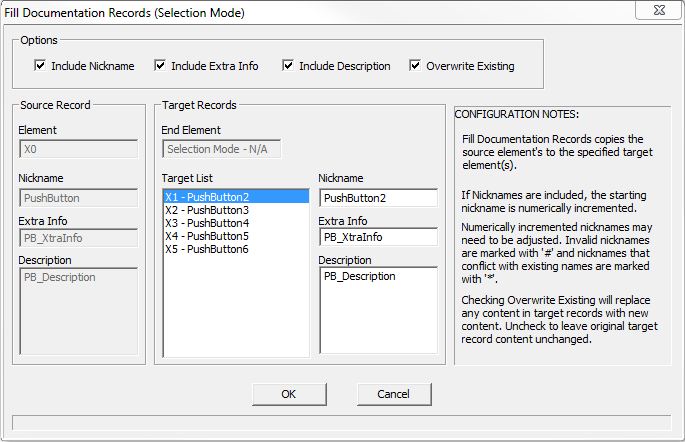
Options selects which documentation fields to include in the Fill operation:
If Include Nickname is selected, a number from 2 through the number of selected Elements is appended to the end of the source Nickname.
If Include Extra info is selected, the contents of the Extra Info field of the source Element are copied to the Extra Info field of the selected Elements.
If Include Description is selected, the contents of the Description field of the source Element are copied to the Description field of the selected Elements.
If Overwrite Existing is selected, the New Records will replace the Nickname, Extra Info, and / /or Description of the Elements in the range. If disabled, Elements that contain Nickname, Extra info and / or Description information will NOT be replaced by the New Record information.
Source Record shows the Element that will be used as the template and its documentation record (Nickname, Extra Info, Description).
Target Records shows the Elements included in the Fill operation and the results of auto-incrementing the Nickname and copying the Extra Info and Description text. The contents of these three fields can be manually edited if required.
End Element is the last Element you want to use in the Fill operation. You can fill up to 100 records per fill operation.
Target List is the currently configured list of Elements (Source Element -> End Element) with their auto-incremented Nicknames.
Take note of the Nicknames listed in this section for any that are bounded by pounds signs or asterisks as this means the Nickname has a problem that must be resolved before the Fill operation can be performed:
Nicknames that are bounded by pound signs # <Nickname> # are invalid for some reason. Nicknames can be 1 to 16 characters in length and consist of any combination of alphanumeric characters and underscores ('_', 'a-z', 'A-Z', 0-9), spaces will automatically be replaced with underscores, no punctuation marks are allowed, and must begin with a letter or an underscore. All of these must be resolved before the Fill operation can be performed.
Nicknames bounded by asterisks * <Nickname> * indicate they are in conflict with other Nicknames, the most likely cause of the problem is that they are duplicates. All of these must be resolved before the Fill operation can be performed.
Nickname is the source Element's Nickname with an auto-incremented number appended to the end.
Extra Info is a copy of the source Element's Extra Info text (if selected, and if it exists).
Description is a copy of the source Element's Description text (if selected, and if it exists).
OK will perform the Fill operation. This will only be available to select if there are no Invalid Nicknames and no Name Conflicts.
Cancel will abort the Fill operation and close the dialog.
Filter
The next button on the toolbar is Filter which is used to refine which entries in the documentation database will be displayed. The filtering is done based which of the Elements, Nicknames, Extra Info, and / or Description fields contain the supplied text.
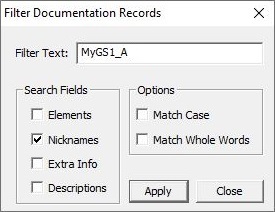
Filter Text is the text to search for in each of the enabled Search Fields.
Search Fields select which areas of the program documentation to search through.
Elements are the actual program elements ( D10, R17, MyTimer.Acc, etc. ).
Nicknames are the user-created, alternate names for the Elements. Nicknames function much like Tag names.
Extra Info are 16 character fields, that are typically used to identify panel wiring. For Symbolic constants the Extra Info field will contain the constant value.
Descriptions are 132 character fields that can be used to provide detailed descriptions of the elements.
Options select the text matching
If Match Case is enabled, the case of the text in the selected Search Fields must match the case of the text in the Filter Text to be included in the result list.
If Match Whole Words is enabled, match text beginning and ending with whitespace.
Apply will perform the filter operation using the selected Search Fields and Options. The filtered list will remain on-screen only as long as the Filter dialog is open.
Close will close the Filter dialog which will stop applying the filtering of the documentation database; the full contents of the documentation database will return to the display.
Go To Logic
The next button on the toolbar is Go To Logic which will locate the first instance of the highlighted item then display the selection in the Ladder View that contains that instance.
Cut / Copy / Paste Element Documentation
The Documentation Editor allows the programmer to copy all of the documentation for an element, or any of the individual documentation fields from one element to another. When using the Documentation Editor many of the familiar Windows keyboard shortcuts for editing functions are available, such as selecting text (SHFT+ Arrow keys), Cut (CTRL + X), Copy (CTRL + C), Paste (CTRL + V), and Undo (CTRL + Z).
Note: Since Nicknames must be unique, they may be modified when pasted to guarantee uniqueness, the new nickname will have an underscore before number _1. For example, if an element with the Nickname "Start" is copied and then pasted into a project that already has an element with the Nickname "Start", the Nickname for the pasted element will be changed to "_Start", or "_Start1", etc. until a unique Nickname is formed.
Copy / Paste All of the Documentation Fields of an Element
To copy all of the documentation from one element to another element,
follow these steps:
-
Click in the Element column for the source Element to select the entire row (it will appear in reverse video).
-
Enter CTRL + C on the keyboard - or select Edit -> Copy from the Menu bar - to copy the selected text.
-
Move the cursor to the target element.
-
Enter CTRL + V on the keyboard - or Select Edit -> Paste from the menu - to paste the documentation into the fields of that Element.
Copy / Paste an Individual Documentation Field of an Element
To copy an individual documentation field from one element to another
element, follow these steps:
-
Double-Click in the field for the source element - the text in that field will appear in reverse video.
-
Enter CTRL +C on the keyboard - or select Edit -> Copy from the Menu bar - to copy the selected text.
-
Double-Click in the desired field of the target element - this puts the Documentation Editor into ’edit mode’ for that field.
-
Enter CTRL + V on the keyboard - or Select Edit -> Paste from the menu - to paste the documentation into the field of that Element.
Cut / Paste (move) All Documentation Fields of an Element
To Cut / Paste (move) all of the documentation from one element to another
element, follow these steps:
-
Click in the Element column for the source Element to select the entire row (it will appear in reverse video).
-
Enter CTRL + X on the keyboard - or select Edit -> Cut from the Menu bar - to cut the selected text.
-
Move the cursor to the target element.
-
Enter CTRL + V on the keyboard - or Select Edit -> Paste from the menu - to paste the documentation into the fields of that Element.
Cut / Paste (move) Individual Documentation Fields of an Element
To copy an individual documentation field from one element to another element, follow these steps:
-
Double-Click in the field for the source element; the text in that field will appear in reverse video.
-
Enter CTRL + X on the keyboard - or select Edit -> Copy from the Menu bar - to cut the selected text.
-
Double-Click in the desired field of the target element - this puts the Documentation Editor into ’edit mode’ for that field.
-
Enter CTRL + V on the keyboard - or Select Edit -> Paste from the menu - to paste the documentation into the field of that Element.
Saving Element Documentation
Notice that the Documentation editor displays the elements in rows. If any of the fields on a row have been changed, the contents of the fields on that row will be automatically written to disk when the programmer navigates away from that row. If the Nickname field has been changed, the contents of the Nickname field will be validated to enforce the valid Nickname rules.
Pressing the ESC key will leave the field editor without saving any changes that have been made to the contents of that field.
Note: As mentioned earlier, a copy of the documentation will be stored in the CPU. Any time the documentation is changed and written to disk, the ’Save to PLC’ icon on the main toolbar will be enabled to remind you that the documentation in the PLC and the disk are no longer in sync.
See Also:
Importing
Element Documentation
Exporting
Element Documentation
Managing Project Documentation