Topic: DMD0275

Element Browser
Any time the Element Browser is opened it will display an exhaustive list of the valid constants, memory locations, ranges, and Nicknames that are appropriate for the context. For example, whenever the programmer is prompted to enter an element while editing instructions, or in the Find dialog when searching for an element, etc. the Element Browser will display a list of valid entries for the current operation. The Element Browser also provides a convenient way to add documentation for any element while that element is being referenced.
If it has been selected as the preferred element selection tool (see below), the Element Browser can be opened at any time by pressing the F9 key. When a program view is in normal display mode (not in Edit Mode or with Status On) the Element Browser can be invoked by double-clicking on an element or highlighting it with the cursor and pressing "Enter".
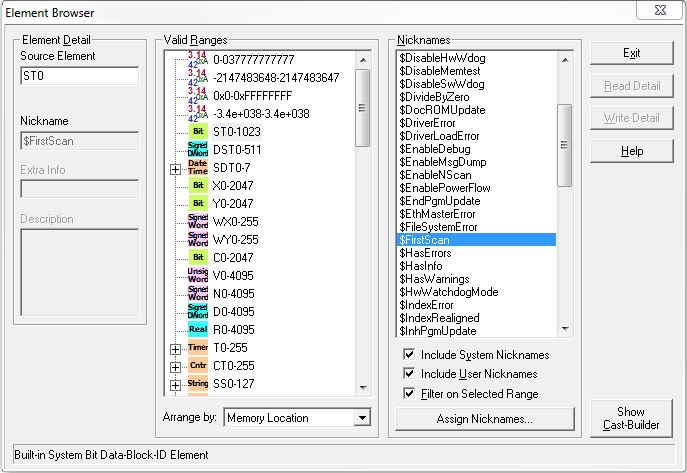
The Element Browser dialog is divided into three areas:
Element Detail - shows the documentation for the currently selected element. If the element is not being edited elsewhere in the system, the Nickname, Extra Info and Description fields are enabled and you may edit them here.
Source Element - this field always displays the currently selected element. If the element is an unassigned nickname, the source element field will be blank.
Nickname - Nicknames must be unique, and can be 1 to 16 characters in length. Nicknames must begin with an alphabetic character or an underscore. For example, _1stPUMP is a valid nickname, but 1stPUMP is not a valid Nickname. Nicknames can consist of any combination of alphanumeric characters and underscores ('_', 'a-z', 'A-Z', 0-9), no spaces or punctuation marks are allowed, and must begin with a letter or an underscore.
Extra Info - a 16 character, user-assigned name for an element. If the Extra Info field is being used as a Symbolic Constant this will contain a numeric entry.
Description - a 132 character field that can be used to provide a detailed description of the element. Text in the Description field can consist of any alphabetic character, alphanumeric value, punctuation mark, and arithmetic operator. If the text for the Description is longer than the column width line breaks will be automatically inserted as necessary to make the Description fit within the column width. The editor allows for the manual addition of line breaks (CTRL + CR) within the Description text to control the formatting of the multi-line Descriptions. The Description can be one to six lines of text.
Valid Ranges - displays an exhaustive list of the valid ranges of elements for the current context. How the Element Browser was invoked controls what is displayed in the Valid Ranges list.
Select Mode - this mode is enabled by clicking the 'magnifying glass' icon while editing an instruction, or pressing the F9 key while in the ladder editor. In this mode the Element Browser is used as a guide in selecting a valid controller data element for the instruction your are editing. Since the Element Browser was called from the ladder editor, the ranges of the elements displayed will be correct for the current instruction.
Browse Mode - this mode is enabled by opening the Element Browser from the menu or clicking the 'magnifying glass' icon on the toolbar. In this mode the Element Browser is used to display the complete list of the ranges for the current controller. Instead of the "Select" button there is an "Exit" button.
Arrange by: - selects the sorting order options for the Valid Ranges list from the following:
Memory Location - sorts the list by the Memory Configuration order
Name - sorts the list alphabetically by Name
Data Size - sorts the list by the size of the elements (Constants, Bits, Words, DWords, Structures )
Nicknames - displays a list of the user-assigned nicknames (and optionally the system defined nicknames) that fall within the ranges of elements in the current Valid Ranges list. When in "Select" mode, double-clicking on a nickname selects that nickname and exits the browser. Highlighting a nickname with a single-click makes it the currently selected element.
Include System Nicknames - when enabled, system-defined nicknames will be included in the list
Include User Nicknames - when enabled, user-assigned nicknames will be included in the list
Filter on Selected Range - when enabled, only nicknames that are in the same range as the selected item will be included in the list
Assign Nicknames.. - button displays the Assign Nicknames dialog where you can associate any unassigned nicknames with an element.
Click OK to save any changes made to the element.
If any of the user-assignable fields have
been changed the 'Read Detail' button will also be enabled. Click Read Detail will read the record from
the database and reload the element detail.
If changes have been made to any of the user-assignable fields the 'Write Detail' button will be enabled. Click Write Detail will write the current Source Element's documentation into the documentation database.
Click Help to display the main Help Topic.
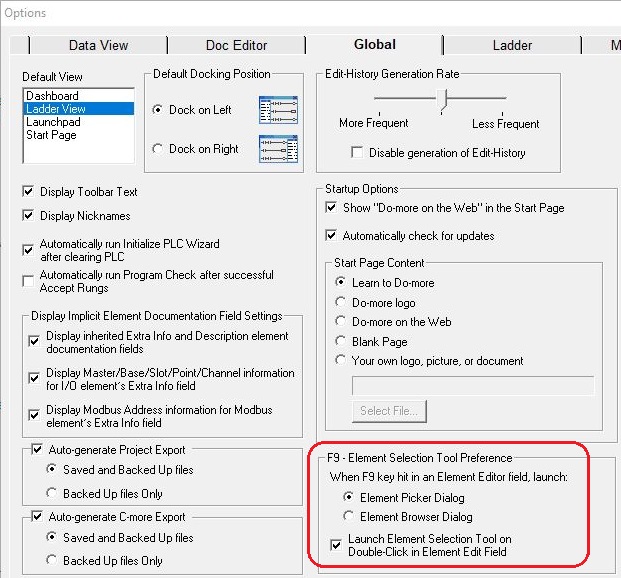
Making the Element Browser the Preferred Element Selection Tool
By default, the Element Picker is the preferred Element Selection Tool, meaning that is the tool that is launched when the user presses F9 while editing any parameter in an instruction. You can change this selection to use the Element Browser on the Global tab of the View-> Options dialog as shown below:
Using the Cast Builder
Click the Show Cast Builder button (or use Alt-C) to reveal the Cast Builder section which assists the user in constructing the appropriate casting operator to get from the selected element's Base Element type to the desired data type and/or size and/or format. Casting is NOT a data conversion operation, casting is a bit-interpretation operation. Casting is typically used for 'bit-picking' and for handling mapped memory elements. For more information on Casting and it's uses, refer to the help topic on Cast Operations.
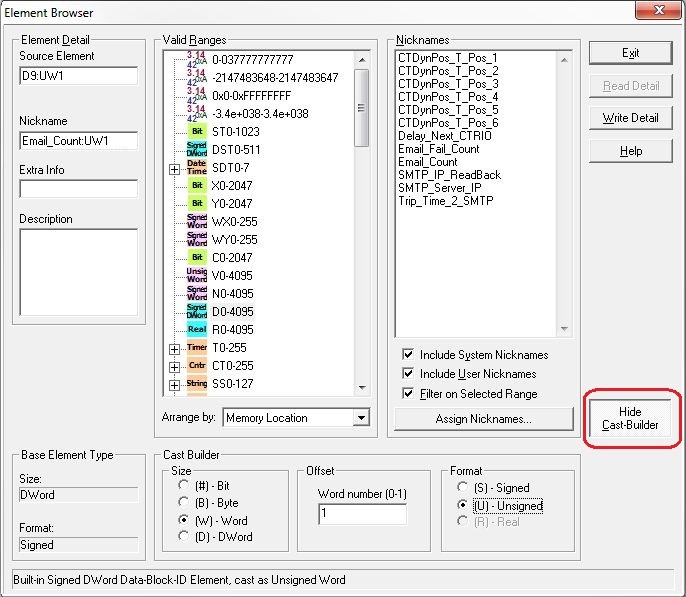
Base Element Type - displays information about the data type and size of the currently selected element.
Cast Builder - based on the selected element, Cast Builder will present the programmer with valid casting options in the Size, Offset and Format selections, which will guarantee that you construct a valid cast operator. As you select casting options for Size, Offset and/or Format, the casting operator will be constructed in the Source Element field.
Size - select the desired size of the data ( Bit, Byte, Word, or DWord ).
Offset - specify the desired byte, word or DWord offset
Format - select the desired format (Signed, Unsigned or Real)
In the above example, the base element is D9 which is a signed 32-bit location. To determine the cast required to access the high word of D9, select Word for the Size, and 1 for the Offset, and Unsigned for the format, this yields a cast operator of D4:UW1.
See Also:
Using the Cross Reference View
Related Topics:
Using the Documentation Editor