Topic: DMD0259

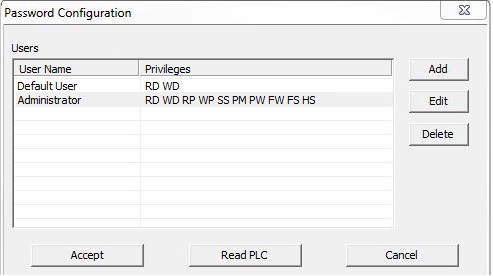
Password Configuration
The Password Configuration is more than simply allowing or denying access to a Do-more CPU based on a user ID and password, it involves the creation of accounts that will allow or deny access to the different resources available in the CPU. By creating multiple accounts, each with different levels of access, you can efficiently control not only who has access to the CPU, but also what each of those users can and cannot do with to the resources in the CPU.
The default password configuration in a Do-more CPU contains a single user account - Default User - that has no password, and has access to all of the CPU's resources. This configuration does not restrict any communication attempt, and does not limit what anyone connected to the CPU can do with the CPU's resources.
The following images show the various places in Do-more Designer where you can see the currently logged in user account:
The Status Bar at the bottom of the Do-more Designer programming window will always display the user account that is currently logged in.

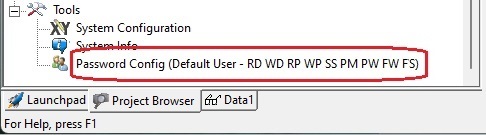
The Project Browser shows currently logged in User Account and Privileges in its Tools section.
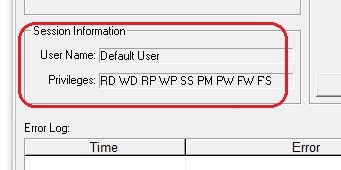
The Link Info dialog (PLC -> Link Setup) shows currently logged in User Account and Privileges in its Session Information group.
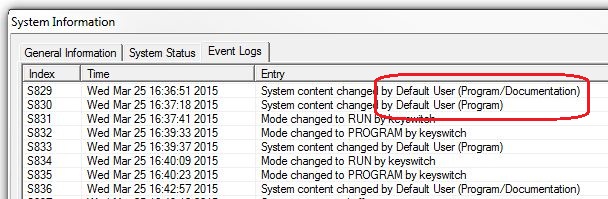
Event Log messages will contain the user account in each log entry.
Default User Account
All Do-more CPUs ship from the factory with a predefined Default User account. The default password for this account is blank, and it cannot be changed. The Default User initially has all of the available privileges, and the account's privileges can be modified only after adding the Administrator account and logging in as the Administrator.
Note: to secure all external access to the CPU by forcing every connection to use a correct password, all permissions must be removed from the Default User account (since you can't delete this account).
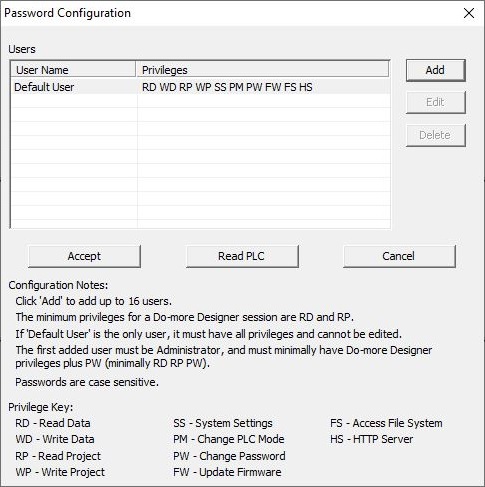
Click Add to open the Add User dialog to create new password configuration accounts.
Click Edit to edit the currently highlighted user account.
Click Delete to remove the currently highlighted user account.
Click Accept to save any changes have been made to the password configuration.
Click Read PLC to read the current password configuration from the CPU.
Click Cancel to abort the password configuration session without saving any changes that were made.
Creating the Administrator Account
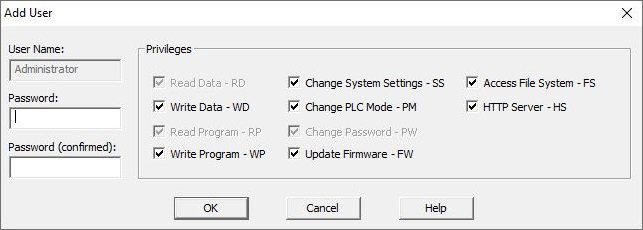
The first user account that must be created is the Administrator account. Clicking the Add button the first time will cause the password configuration utility to prompt for a password for the Administrator account, and to choose the optional privileges for the Administrator account. Password / Password Confirmed must be 4 to 32 characters in length (Do-more versions previous to 2.10 only allowed 4 to 8 character passwords) with no embedded white-space characters. Passwords must be unique. Passwords are also case sensitive. Passwords cannot be left blank.
Note: The Read Project (RP), Read Data (RD, and Change Password (PW) privileges are required for the Administrator, and cannot be removed from the Administrator account. The Password Configuration utility will make sure there is always at least one User account that has sufficient privilege to manage the Password Configuration. The Administrator account can only be deleted if it is the only user account defined. If the Administrator account is ever deleted while it is the only user account defined, the Default User account will be automatically recreated with it's default privileges and a blank password.
Notice that once the Administrator account has been created, the Default User account will automatically be changed to have only the Read Data (RD) and Write Data (WD) privileges. At this point the privileges for Default User account can be changed. As long as the Default User account exists, any connection attempt to the CPU that DOES NOT have a password, and any attempt with a bad password, will be accepted and that connection will have the privileges the Default User account has. If you want to require that every connection use a correct password, you should remove all privileges from the Default User account.
Creating New User Accounts
Once the Administrator account has been created, up to 15 additional user accounts can be created. Click the Add button to open the following dialog:
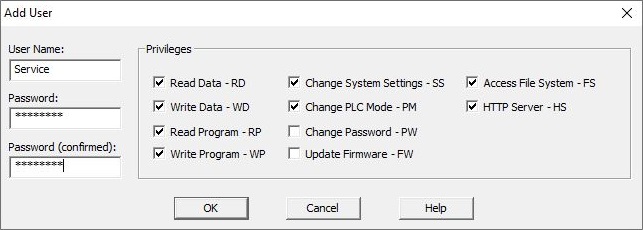
User Names must be 1 to 16 characters in length.
Password / Password Confirmed must be 4 to 32 characters in length with no embedded white-space characters. Passwords must be unique. Passwords are also case sensitive. Passwords cannot be left blank.
Account Privileges are assigned to each new User Name. The default privileges for a New User will have all privileges enabled, allowing access to all of the resources in the CPU.
User Accounts must have a minimum of Read Data (RD) and Read Project (RP) to allow an online session with the Do-more Designer programming software.
User Accounts most likely need a minimum of Read Data (RD) and Write Data (WD) to allow an online session with a C-More HMI panel from Automationdirect.com.
User Accounts must have a minimum of Read Data (RD) to allow an online session with another Do-more CPU using a Do-more Network Read (RX) instruction.
User Accounts must have a minimum of Write Data (WD) to allow an online session with another Do-more CPU using a Do-more Network Write (WX) instruction.
The following is a list of the available privileges and details what each privilege allows the user of that account to access:
User accounts with the Read Data (RD) privilege can read from all of the data locations in the CPU.
User accounts with the Write Data (WD) privilege can update all of the data locations in the CPU.
User accounts with the Read Project (RP)privilege can read the ladder program, the system configuration, and the documentation from the CPU.
User accounts with the Write Project (WP) privilege can update the ladder program, the system configuration, and the documentation in the CPU.
User accounts with the Change System Settings (SS) privilege can set the system clock, clear the system log, and clear the user log.
User accounts with the Change PLC Mode (PM)privilege can change the CPU mode (PROGRAM, RUN), and invoke the runtime debugging features (Single Scan
The controller will make one pass through all of the enabled code-blocks, reading and writing I/O and executing the ladder logic that would normally be processed on that scan, then stop with the controller in Pause mode., N-Scan
User accounts with the Change Password (PW)privilege can create new users and modify existing user accounts (change passwords, add privileges, and remove privileges). User accounts that do not have Change Password (PW) privilege cannot open the Password Configuration dialog.
User accounts with the Update Firmware (FW)privilege can update the firmware in the CPU.
User accounts with the Access File System (FS) privilege can use the Browse PLC File Systems utility in Do-more Designer to read and write to the RAM and SDCard file systems in the CPU.
User accounts with the HTTP Server privilege can enable and access the BRX CPU's on-board Web Server, and use the BRX CPU's built-in REST API to read from the CPU's memory locations.
Logging in with a User Account
Any time Do-more Designer requests an online session with the CPU that has multiple user accounts, the programmer will be asked to log in by entering the password for one of the user accounts before the online session will be started.
The PLC -> Re-open Session... menu selection allows the programmer to change User Accounts without having to close and re-open the project. This menu selection will prompt the programmer for the password of the User Account to start using. After a successful re-login, the Status Bar at the bottom of the Do-more Designer programming window will display the new user account name.
What are Failed Login Attempts?
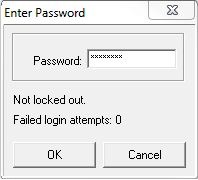
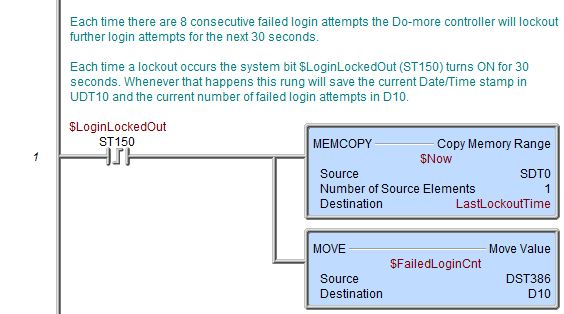
As part of the overall System Security suite, the Do-more PLC tracks the number of failed attempts to login using any of the User Account passwords in an effort to help prevent attempts at hacking the PLC password. Any time there are 8 consecutive failed attempts at entering the password, the Do-more CPU will lock out the ability to login over any of the communication ports for the next 30 seconds.
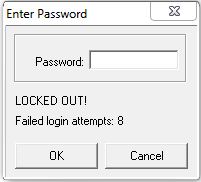
During this lockout time, the Enter Password dialog will display the text Locked Out!, and the system bit $LoginLockedOut (ST150) will be ON. Entering the correct password during the lockout period will NOT allow an online session with Do-more Designer or allow communication sessions from C-More HMI panels, or remote PLCs using RX - Do-more Network Read or WX - Do-more Network Write instructions. The lockout time must expire before a successful online session can be made from any client.
After the 30 seconds of Lockout time has expired the system bit $LoginLockedOut will turn automatically OFF and it will take 8 more failed attempts before another lockout will occur.
A running total of the failed login attempts is stored in the retentive System location $FailedLoginCnt (DST386). The value in this location does NOT define the number failed login attempts before login sessions are locked out, that number is fixed at 8. Below is an example of how this might be used in the project is to save the Date and Time that a Lockout occurred.
Resetting the Failed Login Count
After any successful login, if the $FailedLoginCnt (DST386) value is not 0, a message will be displayed in the Output Window showing the current value with the option to reset the value to 0.

Clearing the Password Configuration
Clearing the password configuration can be accomplished in the following three ways:
-
Use the Password Configuration dialog to delete the User Accounts individually. Remember that the Administrator account can only be deleted if it is the only user account defined. If the Administrator account is ever deleted the Default User account will be reset to it's factory configuration with it's default privileges and a blank password.
-
Perform a Clear PLC Memory utility with the selection for Password Configuration checked, this will remove all of the user-assigned password configuration and if necessary, the Default User account will be restored to it's factory configuration with it's default privileges and a blank password.
-
Perform a manual reset of the Do-more CPU using the information found in the help topic How to Manually Reset the Password Configuration in a Do-more CPU. This too will remove all of the user-assigned password configuration and if necessary, recreate the Default User account will be reset to it's factory configuration with it's default privileges and a blank password.
See Also:
How to Manually Reset the Password Configuration in a Do-more CPU
How to Manually Reset the Password Configuration in the Do-more Simulator