Topic: DMD0283

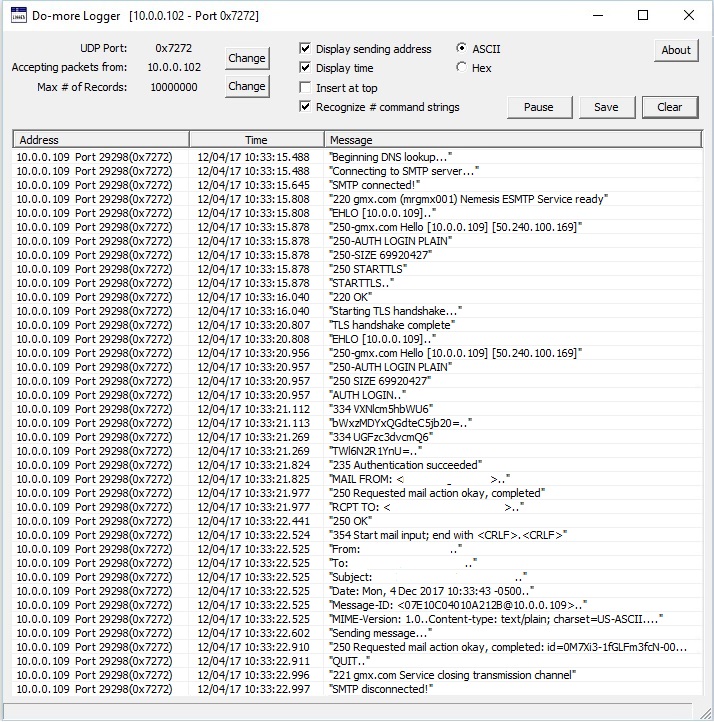
Do-more Logger (Network Message Viewer)
The Do-more Logger utility runs on a PC and is used to capture and display
debug and status messages received from an Ethernet-equipped Do-more CPU. The Do-more CPU uses Ethernet broadcast packets to send data to
Do-More Logger, which means the Do-more CPU and the PC running Do-More Logger must be in the same Broadcast Domain![]() A broadcast domain is a logical network segment in which any device connected to the network can directly transmit to any other on the domain without having to go through a routing device. These are typically very basic networks that use hubs rather than switches or routers. A special broadcast address consisting of all 1s is used to send frames to all devices on the network..
A broadcast domain is a logical network segment in which any device connected to the network can directly transmit to any other on the domain without having to go through a routing device. These are typically very basic networks that use hubs rather than switches or routers. A special broadcast address consisting of all 1s is used to send frames to all devices on the network..
Turning ON the system bit $EnableMsgDump (ST36), instructs the Do-more CPU to begin generating and sending the debug messages through the Ethernet port. Note: the system bit $DumpToSecAdaptr (ST38) must also be turned ON to send packets through the Secondary Ethernet Port of a BRX CPU (the BX-P-ECOMEX) instead of on-board Ethernet port.
When DMLogger is launched the following dialog is displayed. This will set the PLC memory locations that control the amount of data that gets sent to the DMLogger:
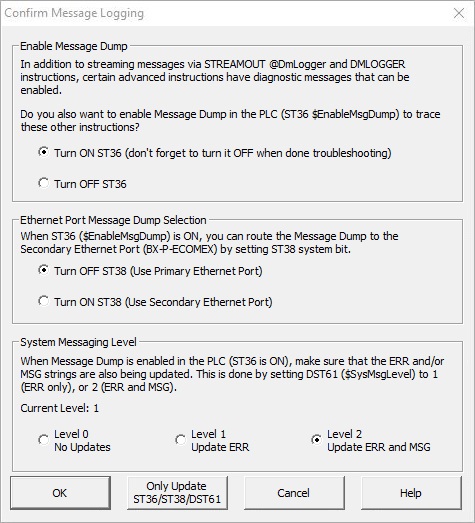
Selections in the Enable Message Dump group enable and disable the PLC's sending data to DMLogger :
Selecting Turn ON ST36 will makes the PLC generate debug messages and send them to DMLogger.
Selecting Turn OFF ST36 stops the PLC generating the debug messages.
Selections in the Ethernet Port Message Dump Selection selects which Ethernet port to route the debugs packets through:
Selecting Turn OFF ST38 will send the packets through the Primary (on-board) Ethernet port.
Selecting Turn ON ST38 will send the packets through the Secondary Ethernet port (BX-P-ECOMEX).
Selections in the System Messaging Level control the amount of debug messaging the PLC will generate and send to DMLogger:
Level 0 - No updates means no Error or Message data will be sent to DMLogger.
Level 1 - Update ERR (default) means only Error messages will be sent to DMLogger.
Level 2 - Update ERR and MSG means Error and Waning Messages will be sent to DMLogger. This is the most verbose selection and is the best selection when debugging network client connections (Email, MQTT, FTP, etc.).
Note: after the debugging session is complete you should return the System Messaging Level to 1.
Ok will write the ST36, ST38, and DST61 selections to the CPU then launch DMLogger
Only Update ST36 / ST38 / DST61 will only write the ST36, ST38, and DST61 selections to the CPU; it will NOT launch DMLogger.
Cancel closes the dialog without writing ST36, ST38, and DST61 selections to the CPU; also will NOT launch DMLogger.
Two Ways of Sending Information to Do-more Logger
Some instructions will automatically send Debug Information to Do-More Logger
Some instructions automatically check to see if the system status bit $EnableMsgDump (ST36) is ON, and if so, these instructions will send debug messages to Do-more Logger without any additional user input.
FTPGET - Retrieve File From Remote
MQTTPUB - IoT Publish MQTT Topics
MQTTSUB - IoT Subscribe to MQTT Topics
HTTPCMD - Process HTTP Command
An example of an instruction that does this is the Send Email (EMAIL) instruction. As long as $EnableMsgDump (ST36) is ON, Send Email will automatically send debug messages to Do-More Logger containing details of the instruction's interaction with the SMTP server that the Email instruction is configured to use. This is a great mechanism to debug SMTP Client connection problems when sending Emails.
Send User-Created Status and Debug Messages to Do-More Logger
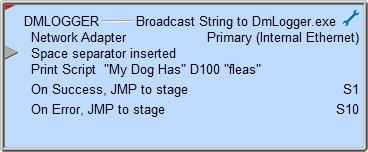
The primary way to send user-created messages to Do-more Logger is the Broadcast String to DMLogger.exe (DMLOGGER) instruction. This instruction uses the same Print Script engine that's used in STRPRINT to construct the String to send to DMLogger. Displaying these runtime status messages are useful for any number of reasons, including, tracing the execution path through a project, verifying intra-scan values of memory locations, etc.
The Stream Out Data to Device (STREAMOUT) instruction can specify Do-More Logger as the target device and send user created status messages at runtime.
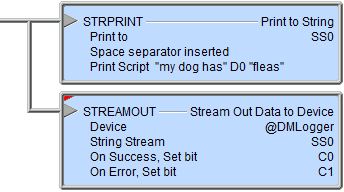
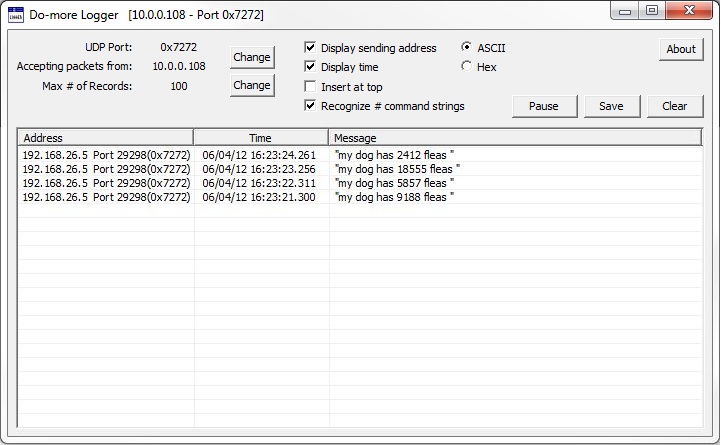
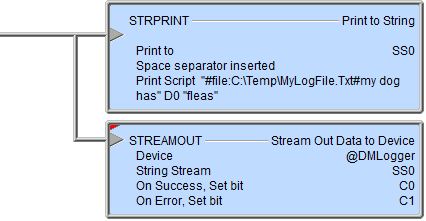
Do-more Logger supports a file logging mechanism that can be accessed at runtime from a Do-more CPU. The typical use of a STRPRINT instruction that will use a STREAMOUT instruction to send a string of ASCII data to Do-more Logger looks like STRPRINT SS0 "my dog has" D0 "fleas" and a STREAMOUT @DMLogger SS0. This will display something like "my dog has 9 fleas" in the Do-more Logger window.
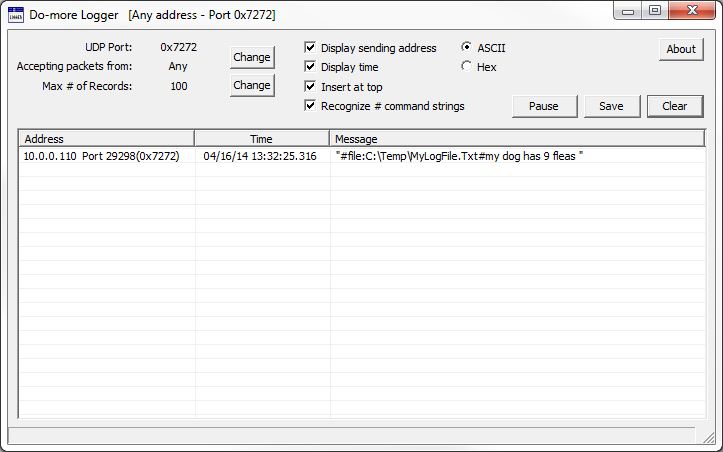
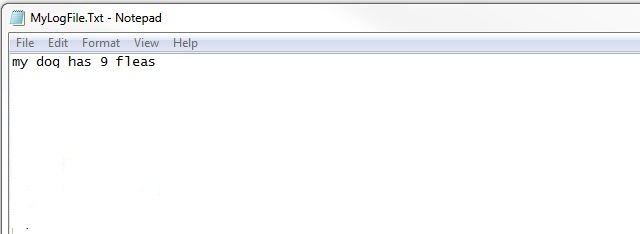
But, if the ASCII string contains the prefix "#file:<filename>#", then Do-more Logger will display that data as before but also append that same string of data to the specified file. For example, the STRPRINT instruction below contains "#file:C:\Temp\MyLogFile.Txt#my dog has" D0 "fleas". If the value in D0 is 9, then a STREAMOUT instruction sending SS0 to @DMLogger will display "my dog has 9 fleas" in the Do-more Logger window AND that same text will also be appended to the end of the file C:\Temp\MyLogFile.Txt.
Note 1: be sure to use the full pathname of the logging file to avoid any
problems with locating the file at a later time. Any folder names specified in the pathname must already exist, they will NOT be automatically
created. If the path or file name specified are invalid for any reason Do-more Logger will display a message to that effect on its status bar.
Even if the path or file name are invalid, the data will still show up in Do-more Logger.
Note 2: multiple Do-more CPUs can write to the same Do-more Logger server, which means that multiple Do-more CPUs can log data in the same file. You can limit which Do-more CPUs are allowed to send data to a particular instance of Do-more Logger in the Edit UDP Port settings described in the next section.
Note 3: a single Do-more CPU can write to multiple Do-more Logger servers, which means that a single Do-more CPU can log data in multiple files.
Each of the file logging operations is autonomous. They work as follows:
If the specified file does not exist it will be created, the data appended to the end of the file, then the file will be closed.
If the specified file does exist the file is opened, the data is appended to the end of the file, then the file will be closed.
Specifying the IP Address and Port Number
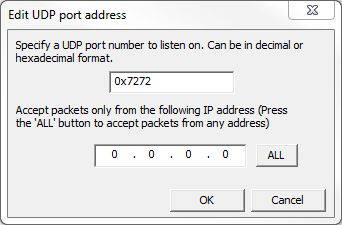
UDP Port: - The UDP Port Number to listen on for network packets. This value needs to be the same as the UDP port number that the sending Do-more CPU's on-board Ethernet port is configured to use. The default value of 0x7272 is the default port number used by the on-board Ethernet port of the Do-more CPU.
Accepting Packets From: - specifies which IP address to accept packets from. The default value of ALL means that all packets destined for the Do-more Logger from any IP address will be accepted and displayed.
The values for UDP Port and Accepting Packets can be altered by clicking the 'Change' button.
The UDP Port can be specified as a decimal number or a hexadecimal number by pre-pending a 0x.
By clicking the 'ALL' button, Do-more Logger will accept packets from any IP Address. To restrict the acceptable sources of packets to a single IP Address, specified that IP Address in the fields provided.
Setting the Display Options
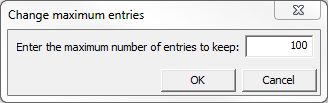
Max # of Records: specifies the maximum number of entries to records to display in Do-more Logger before the oldest entries are written over.
If Display Sending Address is enabled, the IP Address that sent the packet will be displayed.
If Display Time is enabled, the time the packet was received will be displayed.
If Insert at Top is enabled, new records will be inserted at the top of the display, if disabled, new records will be added to the bottom of the display.
If Recognize # command strings is enabled, all recognized "#command" text received - such as the #file discussed above - will be treated as a command for Do-Logger, if disabled, any "#command" will be displayed as text.
Display format specifies what format to display new messages
Click the Pause button to temporarily stop the Logger from adding new records to the display. This only pauses what is added to and deleted from the display, however, packets are still being received in the background and all of them (up to the max # of records) will appear in the display once the Un-Pause is clicked.
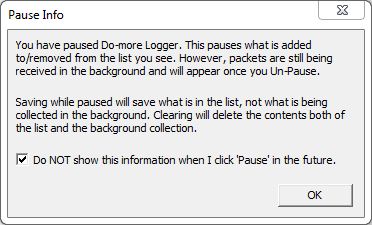
If a Save operation is executed while the display is paused, only the data that is currently is the display list will be written to disk, any data that has been received in the background will NOT be saved.
A Clear operation that is executed while the display is paused will clear both the display and any data received in the background.
Click the Save button to open a dialog that allows the programmer to save the contents of the display in a CSV file. Saving to a file while paused will only save what is displayed in the list, not what is being collected in the background.
Click the Clear button to clear all data.. The clear operation will delete the contents of display and any packets collected in the background.
Click the About button to display the current version of the Do-more Logger.