Topic: DMD0456

HTTPCMD - HTTP Request / Response with Server
Note: this instruction can only be used with a BRX CPU !
The Hypertext Transfer Protocol (HTTP) works as a request-response protocol between the Do-more PLC as the network client and a server. The PLC client submits an HTTP request to the server; then the server returns a response to the PLC. The response contains both status information about the request itself, and the requested content if applicable. The HTTP Request / Response with Server (HTTPCMD) instruction implements the following 5 HTTP commands: GET which is used to request data from the specified server. HEAD which is almost identical to GET, but without returning data in the Response Body, POST and PUT which are used to send data to a server to create or update a resource, and DELETE which removes the specified resource.
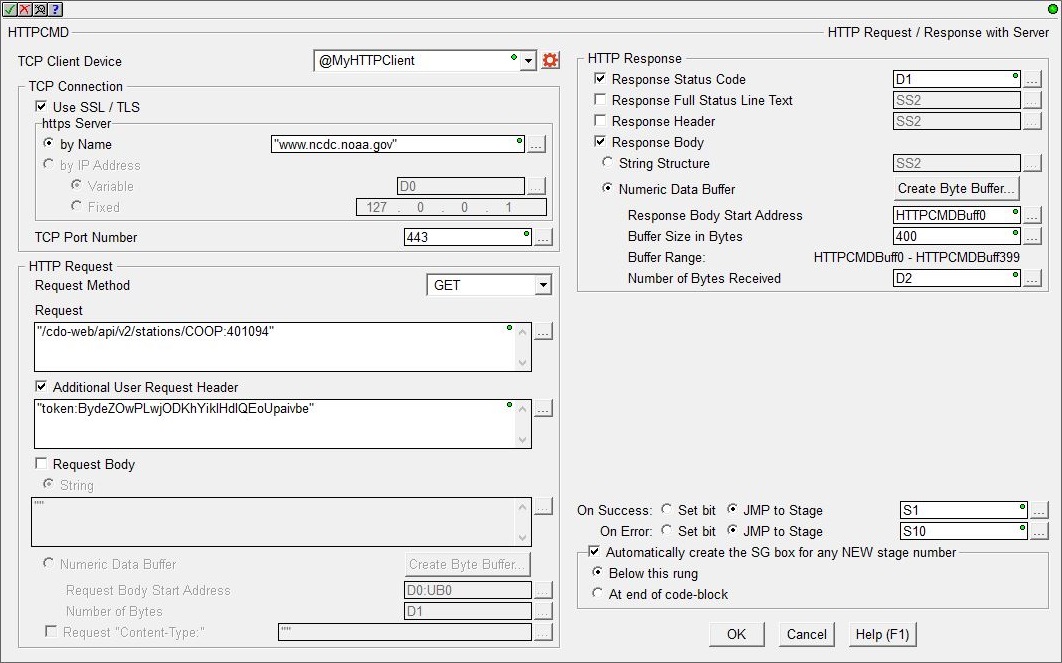
The TCP Client Device selects which of the preconfigured TCP Client devices to use.
no devices available means there are no preconfigured TCP Client devices. Select the create device option to open the Device Configuration dialog of the System Configuration to create a new TCP Client device.
The TCP Connection group contains selections that establish the required network connection to an HTTP server:
Use Use SSL / TLS option if the HTTP server requires an encrypted connection. TLS version 1.2 is currently being used.
Note: using SSL / TLS encryption is a very CPU intensive operation because of the math involved. Because the CPU must keep the PLC's scan time in check, the SSL encoding is processed as a time-slicing event, meaning that only a portion of each scan time is used to work on the encryption; this prevents the scan time from exceeding the watchdog timer. Processing the encryption can take several seconds depending on the number of security certificates that must be processed and the amount of data being transferred.
The amount of time the CPU allots to processing TLS transactions on each scan is called the TLS Timeslice. This value can be changed on the CPU page of the System Configuration. Increasing this value can allow the TLS process to complete sooner, but at the cost of increasing the PLC's scan time. The Default TLS Timeslice value will be used by the TLS encryption engine each time the PLC powers up and goes into RUN mode. RUN-mode changes to this value can be made by changing the value in $TLSTimeslice (DST68).
https Server selects how the connection to the HTTP Server will be established:
By Name is the name of the HTTP server that will receive the request. This can be text that is already stored in a system-defined String, or a user-defined String, or enter the text within double quotes in the space below. The Name is not case-sensitive.
By IP Address will use the IP Address of the server. This can be either the traditional dotted-decimal form for a static IP address or a DWord numeric location containing the IP Address if it needs to be set at runtime. Note: this option is not available when Use SSL / TLS is enabled.
TCP Port Number specifies the port number the connection will use. The default value of 80 is typical for HTTP traffic to unencrypted servers. The value 443 is typically used for HTTPS traffic using (SSL / TLS) encryption. This can be any constant between 1 and 65534, or any Numeric memory location containing a value in that range.
The HTTP Request group contain the selections that build up the command that will be sent to the HTTP server.
The Request Method selects which HTTP function to send:
GET is used to request data from a specified resource. The query string (name / value pairs) is sent in the URL of a GET request. The requested data will be returned in the Response Body.
HEAD is almost identical to GET, but without returning any data in the Response Body. For example, if "GET /users" returns a list of users, then "HEAD /users" will make the same request but will not return the list of users. HEAD requests are useful for checking what a GET request will return before actually making a GET request.
POST is used to send data to a server to create or update a resource. The data sent to the server with POST is stored in the Request body of the HTTP request.
PUT is also used to send data to a server to create or update a resource. The difference between POST and PUT is calling the same PUT request multiple times will always produce the same result. In contrast, calling a POST request repeatedly have side effects of creating the same resource multiple times.
DELETE method deletes the specified resource.
The Request, often called the query-string, is a string of information that the server can use as parameters. The Request is usually one or more name and value pairs; for example, term=bluebird. Name and value pairs are separated from each other by an ampersand (&); for example, term=bluebird&source=browser-search. Components in the Request are case-sensitive. This can be text that is already stored in a system-defined String, or a user-defined String, or enter the text within double quotes in the space below.
Enable the optional Additional User Request Header selection to include any additional header fields in the request. Request Headers define the operating parameters of an HTTP transaction. They allow the client to pass additional information to the server with the request. A Request header consists of its case-insensitive name followed by a colon ':', then by its value (without line breaks). Leading white space before the value is ignored. Request Headers can be text that is already stored in a system-defined String, or a user-defined String, or enter the text within double quotes in the space below.
Note: if there is only one user request header entry you do not have to enter the terminating <CR><LF>, the Do-more CPU will do that for you. If you have multiple user request headers you will need to place the required <CR><LF> termination characters after each header. You can use the Print to String (STRPRINT) instruction to build up the list of headers and store it in a String then reference that String here.
Enable the optional Request Body selection to send data bytes immediately following the headers. This is where the data sent to the server with POST or PUT methods is stored. If the Request Body text is shorter than 1024 bytes, then select String; if longer than 1024 bytes then select Numeric Data Buffer.
Select String Structure if the Request Body text has been stored in a system-defined Short String (SS, up to 64 bytes), system-defined Long String (SL, up to 256 bytes), a user-defined String (up to 1024 bytes), or enter up to 1022 bytes of text within double quotes in the box below.
Select Numeric Data Buffer if the Request Body text has been stored in a numeric data block, aka Byte buffer, (up to 65000 bytes).
Click Create Byte Buffer... to create a new data block of bytes to store the Request Body text. You will need to specify the Data Block Name (1 to 16 letters) names must be unique, and consist of 1 to 16 characters (A-Z, a-z; no numbers, no spaces). The default name is HTTPCCMDBuff, but it can be changed. You will also specify Number of Elements is the number of bytes (maximum of 65000) in the data block. The data blocks must be created on a DWord (4-byte) boundary. And specify whether to Make Data Block Retentive (retain values after power loss) will have the data block hold its state through a power cycle or a Program-to-Run mode transition. Memory NOT marked as retentive will be cleared at power up and during a Program-to-Run mode transition.
Request Body Start Address is the beginning offset into the Byte buffer where the Request Body data begins.
Number of Bytes is maximum number of bytes to send as the Request Body. This can be any constant value from 1 to the maximum size of the Byte buffer.
The Buffer Range shows the range of bytes in the buffer that will be used as defined by the Request Body Start Address and by the Number of Bytes.
Note: when online and using a Numeric Data Buffer to store the text for the Request Body, use the Memory View with ASCII format to see the contents of the Numeric Data Buffer in human-readable text form.
Enable the optional Request "Content-Type" to include the Content-Type header with the user-supplied type and sub-type. This can be text that is already stored in a system-defined String, or a user-defined String, or enter the text within double quotes. Two of the more common Content-Types are:
application which represents application data or binary data. For instance, Content-Type: application/json; charset=utf-8 designates the content to be in the JavaScript Object Notation (JSON) format, encoded with UTF-8 character encoding.
text indicates that the content is plain text and no special software is required to read the contents. The subtype represents more specific details about the content, which can be used by the client for special processing. For instance, Content-Type: text/html indicates that the body content is text in HTML format.
Note: the parameter string should NOT include the text “content-type:” because the PLC does that automatically. They only need to specify the content-type value "text", or "html".
The HTTP Response group contains optional selections that will handle the data that is returned from the HTTP Request. All of the HTTP Response selections are optional
The Response Status Code is a numeric value returned from the server. This can be any writable numeric location. The most common Response Codes are :
200 - (OK) the request has succeeded. The information returned with the response is dependent on the method used in the request.
204 - (No Content) the server has fulfilled the request but does not need to return an entity-body, and might want to return updated meta-information.
304 - (Not Modified) if the client has performed a conditional GET request and access is allowed, but the document has not been modified, the server SHOULD respond with this status code.
400 - (Bad Request) the request could not be understood by the server due to malformed syntax.
401 - (Unauthorized) the request requires user authentication.
403 - (Forbidden) the server understood the request, but is refusing to fulfill it. Authorization will not help.
404 - (Not Found) the server has not found anything matching the Request.
409 - (Conflict) the request could not be completed due to a conflict with the current state of the resource.
500 - (Internal Server Error) the server encountered an unexpected condition which prevented it from fulfilling the request.
Enable the Response Full Status Line Text selection to store the entire response status line as text, the first part of which contains the Response Status Code as text.
Enable The Response Header is used to give a more detailed context of the response.
Enable the optional Response Body selection to store the body of the response data. If the Response Body text is shorter than 1024 bytes, then select String; if longer than 1024 bytes then select Numeric Data Buffer.
Note: if the response data is JSON text, use the JSON Pretty Print utility to see the Response Body text formatted for readability.Select String to store the Response Body text in a system-defined Short String (SS, up to 64 bytes), system-defined Long String (SL, up to 256 bytes), or a user-defined String (up to 1024 bytes).
Select Numeric Data Block Containing Text to store the Response Body data in a numeric data block, aka Byte buffer, (up to 65000 bytes).
Click Create Byte Buffer... to create a new data block of bytes to store the Response Body text. You will need to specify the Data Block Name (1 to 16 letters) names must be unique, and consist of 1 to 16 characters (A-Z, a-z; no numbers, no spaces). The default name is HTTPCCMDBuff, but it can be changed. You will also specify Number of Elements is the number of bytes (maximum of 65000) in the data block. The data blocks must be created on a DWord (4-byte) boundary. And specify whether to Make Data Block Retentive (retain values after power loss) will have the data block hold its state through a power cycle or a Program-to-Run mode transition. Memory NOT marked as retentive will be cleared at power up and during a Program-to-Run mode transition.
Response Body Start Address is the beginning offset into the Byte buffer where the Response Body data begins.
Buffer Size in Bytes is maximum number of bytes that can be used to store the Response Body text. This is typically length of the Byte buffer being used.
The Buffer Range shows the range of bytes in the buffer that will be used as defined by the Response Body Start Address and by the Buffer Size in Bytes.
Number of Bytes Received is the actual number of bytes from the Response Body that were stored in the Byte buffer.
Note: when online and using a Numeric Data Buffer to store the text for the Response Body, use the Memory View with ASCII format to see the contents of the Numeric Data Buffer in human-readable text form.
The On Success and On Error parameters specify what action to perform when this instruction completes. You do not have to use the same type of selection for both On Success and On Error.
If the Set Bit selection is used for either On Success or On Error, the specified BIT location will be SET OFF when the instruction is first enabled and will remain OFF until the instruction completes. Once complete, the appropriate Success or Error bit location will be set ON. The specified Bit location is enabled with a SET (Latch) operation (not an OUT operation) meaning that it will remain ON even if this instruction's input logic goes OFF.
If the JMP to Stage selection is used for either On Success or On Error the target Stage must be in the same Program code-block as this instruction, you cannot specify a target Stage that exists in a different Program code-block. When the operation finishes, the target Stage will be enabled the same way as a standalone Jump to Stage (JMP) instruction would do it. The JMP to Stage option will only be selectable if this instruction is placed in a Program code-block.
On Success selects which of the following actions to perform if the operation is successful:
- Enable Set Bit then specify any writable bit location.
- Enable JMP to Stage then specify
any Stage number from S0 to S127 in the current Program code-block.
On Error selects which of
the following actions to perform if the operation is unsuccessful:
- Enable SET Bit then specify writable bit location.
- Enable JMP
to Stage then specify any Stage number
from S0 to S127 in the current Program code-block.
If either the On Success or On Error selections are set to JMP to Stage, Automatically create the SG box for any NEW stage number will be enabled which will automatically create any target stage that does not already exist.
- Below this rung will create the new target stage on a new rung following this instruction.
- At end of code-block will create the new target stage on the last rung of this Program.
Status Display
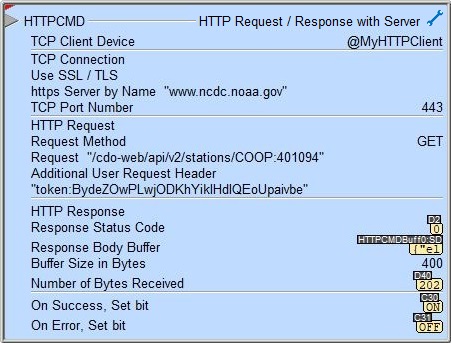
The red triangle in the upper left corner of the status display indicates this is a Fully Asynchronous instruction.
The gray triangle at the right end of an input leg indicates the input is edge triggered, meaning that each time the input logic transitions from OFF to ON the instruction will run one time to completion.
See Also
Related Topics
HTTPCMD - HTTP Request / Response with Server
MQTTPUB - IoT Publish MQTT Topics
MQTTSUB - IoT Subscribe to MQTT Topics
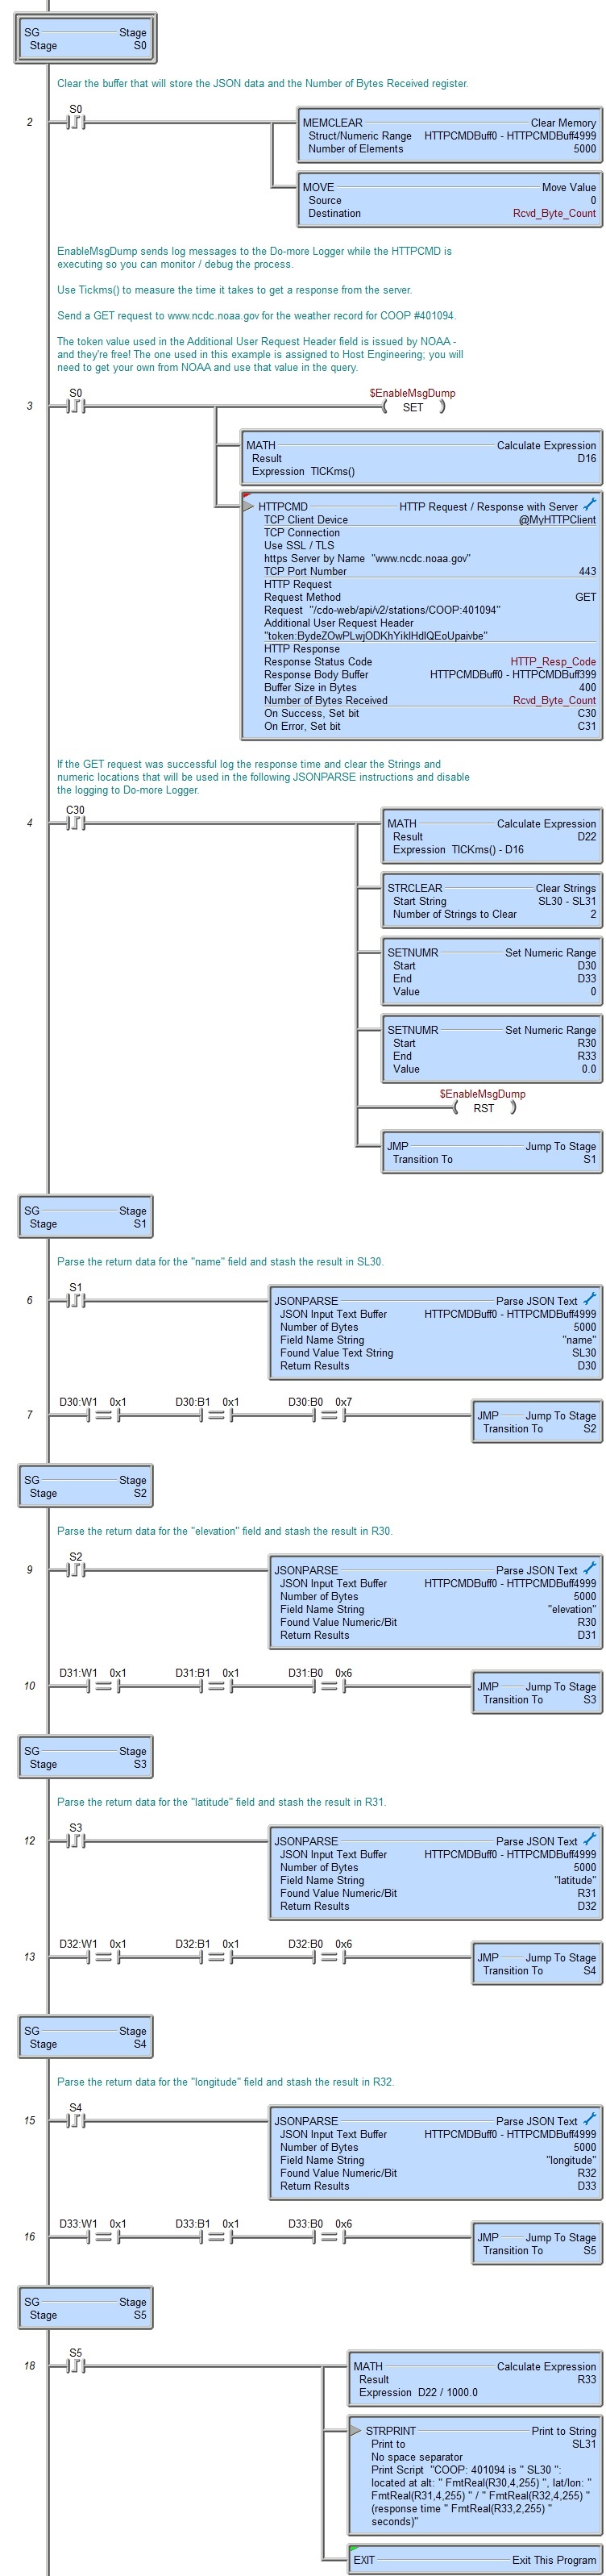
Example