Topic: DMD0068
EMAIL - Send Email
The Send Email (EMAIL) instruction is used to send an Email message. This instruction is only valid for Do-more CPUs that have an on-board Ethernet port. The message portion (body) of the Email can be any combination of text and data elements from the PLC. An Email can also send an attachment which can be any file on any of the built-in file systems.
The Send Email instruction requires the use of a predefined SMTP Client device that is created in the Device Configuration section of the System Configuration. The SMTP Client device will specify the SMTP Server's address information and account authentication (if required). The SMTP Client can be configured to use an unsecured SMTP server on Port 25, or to use an encrypted connection - using SSL (port 465) or TLS (port 587) - to a secure SMTP server using STARTTLS protocol. Email servers that support encrypted connections using STARTTLS also require a username and password to authenticate.
Note: using SSL / TLS encryption is a very CPU intensive operation because of the math involved. Because the CPU must keep the PLC's scan time in check, the SSL encoding is processed as a time-slicing event, meaning that only a portion of each scan time is used to work on the encryption; this prevents the scan time from exceeding the watchdog timer. Processing the encryption can take several seconds depending on the number of security certificates that must be processed and the amount of data being transferred.
The amount of time the CPU allots to processing TLS transactions on each scan is called the TLS Timeslice. This value can be changed on the CPU page of the System Configuration. Increasing this value can allow the TLS process to complete sooner, but at the cost of increasing the PLC's scan time. The Default TLS Timeslice value will be used by the TLS encryption engine each time the PLC powers up and goes into RUN mode. RUN-mode changes to this value can be made by changing the value in $TLSTimeslice (DST68).
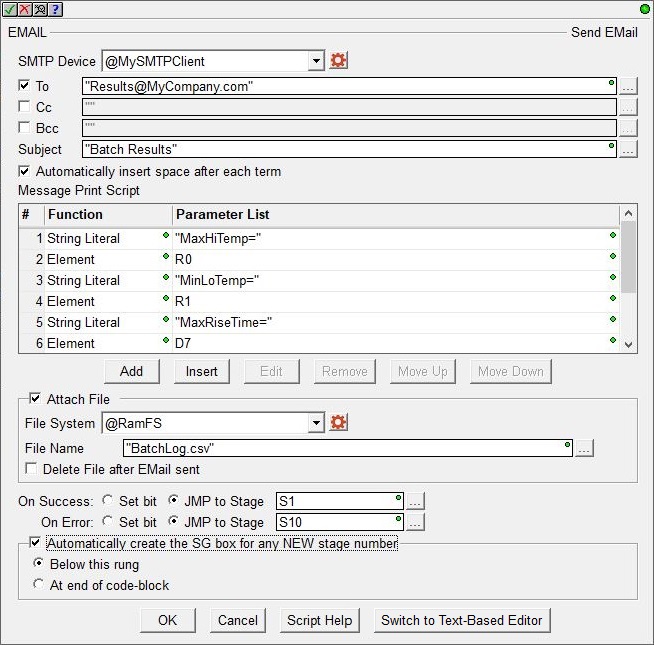
Beginning with Do-more Designer version 2.8, the Email instruction editor will use a new table-style editor instead of the text-based editor used in the previous versions. The table-style editor works by building a series of commands with their required data parameters that will sequentially add content to the message body text. Each table entry is built by a sub-dialog which makes it very easy to correctly use the script functions any their required parameters.
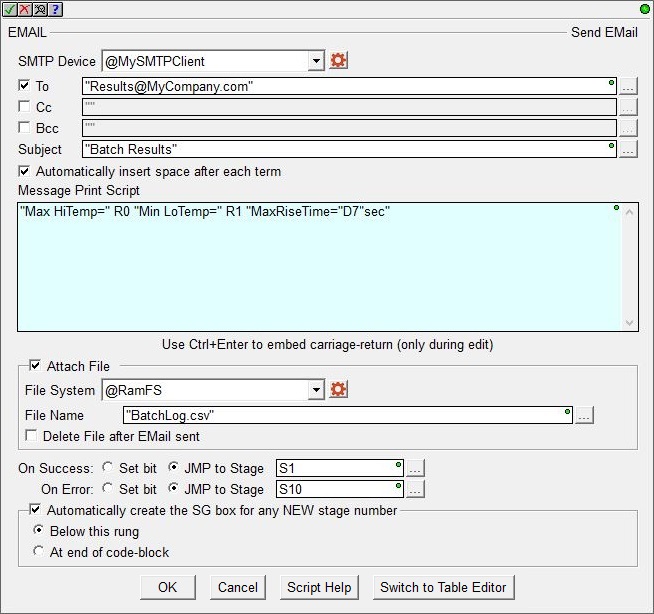
The original text-based editor can still be used by clicking the Switch to Text-Based Editor button at the bottom of the instruction editor. The text-based editor works by letting you enter the text data and script functions as a single entry. The text-based editor can be quicker for constructing simple Message bodies, or for those who don't need the assistance of the message print script function's sub-dialog editors.
This instruction will be using an Ethernet port, which is a shared hardware resource. The Ethernet port's ability to concurrently handle multiple communication client instructions as well as multiple communication servers while handling EMAIL instructions is provided through a device driver. The device driver allows the port to process these concurrent requests without the need for additional interlocking logic in the ladder program.
For example, DirectLOGIC PLCs use the 'Port Busy' SP relay in the ladder program to interlock all of the RX and WX communication requests that target the same Ethernet port. That interlocking logic is NOT required with this instruction because the device driver that manages the Ethernet port provides all of the required interlocking internally.
Parameters:
Note: Use the F9 key or click the 'three dot box' at the right edge of the parameter field to open the Default Element Selection Tool (the Element Picker or the Element Browser) or use the Down-Arrow key (Auto-Complete) on any parameter field to see a complete list of the memory locations that are valid for that parameter of the instruction.
SMTP Device selects the SMTP Client device to use to send the Email.
double-click to create device means there are no SMTP Client devices that can execute this instruction. The most likely causes are there are no SMTP Client devices configured, or the CPU does not have an on-board Ethernet port.
Select create device to create a new SMTP Client. An SMTP Client device must be created before the Send Email instruction can be added to a program.
In common usage, the To field recipients are the primary audience of the message, Cc (Courtesy Copy or Carbon Copy) field recipients are others whom the author wishes to publicly inform of the message, and Bcc (Blind Carbon Copy) field recipients receive the Email without anyone else (including the To, Cc, and Bcc recipients) seeing who the Bcc recipients are.
The To, Cc, and Bcc fields are each limited to 1024 characters. The Email addresses in these fields must be in the form of X@Y.Z. Multiple Email addresses can be entered in each of these three fields; separate each Email address with commas.
To is a list of one or more primary audience Email addresses separated by commas. This can be a string literal (text in double quotes), or any String element.
Cc (optional) is a list of one or more Courtesy Copy (or Carbon Copy) Email addresses separated by commas. This can be a string literal (text in double quotes), or any String element.
Bcc (optional) is a list of one or more Blind Carbon Copy Email addresses separated by commas. This can be a string literal (text in double quotes), or any String element.
Subject contains the test for the subject line of the Email. The total number of characters allowed in Subject line is limited to 1024. This can be a string literal (text in double quotes), or any readable String element.
Checking Automatically insert space after each term will insert a space between the terms when the instruction is processed. This is most useful when the Message Field contains only a list of elements that would otherwise require a manually entered space character to separate the items.
For example, assume that V0 contains the value 1234, and V1 contains 5678, and V2 contains 9012.
If Message is specified as V0 V1 V2 and the 'Automatically insert space' is checked the result will be "1234 5678 9012".
If Message is specified as V0 V1 V2 and the 'Automatically insert space' is NOT checked the result will be "123456789012".
The same result can be created by manually inserting space characters in the Message like this: V0 " " V1 " " V2.
The Message Print Script contains the text that will become the body of the email message. This is constructed using either the table-style editor (where a sequence of commands and their required parameters can be entered) or a text-based editor which builds the body from a single entry of text, commands and data.
Using the Table-Style Editor to build the Message Body
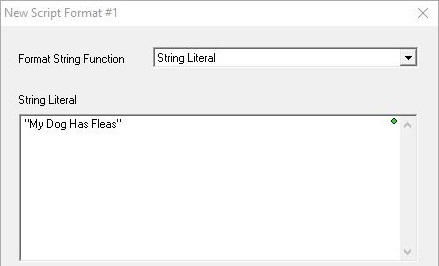
After selecting Add, Edit, or Insert the sub-command editor will open where one of the available sub-commands can be selected and it's required parameters can be entered. The various sub-commands and their parameters are described in the sections that follow.
When the editing session is done, use the buttons at the bottom of the dialog as follows:
Save will save any changes that were made to the sub-command and close the row editor.
Save / Next will save any changes that were made to the sub-command, and begin an edit session for the next row in the table.
Save / Insert will save any changes that were made to the sub-command, and create a new command entry below the row that was just saved.
Cancel will close the row editor without saving any changes that have been made.
The following is a list of the available commands and their required parameters for constructing the message body text with the table-style editor:
Element
This function places data elements from the CPU memory into a string using the element's default display format. Any Bit (X0, Y0, C0, ...), numeric element (D0, R0, N0), constant value (3.14159, ...), or individual structure field (such as T0.Acc, MyPID.SP, MyProgram.RanThisScan, ...) can be specified.

String Literal
String literals are ASCII characters enclosed within a pair of double quotes.
"This string is being sent from a BX-DM1E-36ED13"
String Literals can also use $-based escape sequences to insert control characters in the text. Each of the codes is preceded by the '$' character.
"The price of part #1 is $$" FmtReal(R0, 5, 2, commas) "$T and part #2 is $$" FmtReal(R1, 5, 2, commas) "$N"
Note: in the ladder display, the $-based control character sequences (except for $$ and $") will be converted to their $hh form, e.g. "$N" will be displayed as "$0D$0A"
The chart below is a list of the available control characters that can be entered in the text:
FmtInt - Format an Integer Value
This function controls how integer numbers will appear in a String.
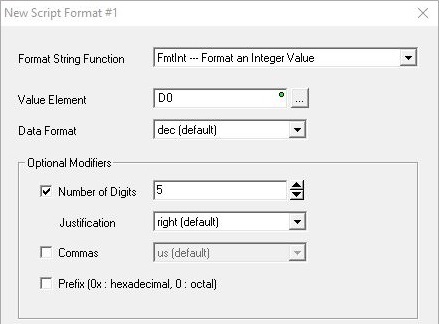
Value Element is the numeric value to format. This can be any readable numeric memory location or any constant value. If the value to format is NOT an integer, it will be converted to an integer then the modifiers will be applied. For example, if you specify a floating point (Real) location like R0, the value in R0 will be converted to an integer, then the modifiers will be applied.
Data Format selects how the value will appear in the String:
- dec (default) : decimal
- oct : octal
- hex : hexadecimal
- ipaddr : will format a DWord value in traditional TCP/IP Address format, that is, four numeric values between 0 and 255, separated by decimal points (192.168.100.200). No other format options are allowed when ipaddr is used.
Optional Modifiers control how the value will be displayed:
Number of Digits specifies how many digits to display in the String, from 2 to 255. The complete value will be displayed if the number of digits specified is too small.
Justification controls the alignment of the digits within the Number of Digits specified above (typically used to align columns of numbers):
- right will right justify the number and pad with leading spaces if needed.
- left will left justify the number and pad with trailing spaces if needed.
- zeropad will right justify the number and pad with leading zeros if needed.
Commas specifies whether commas will be placed in the result:
- us uses US style separators which places commas between each three digits of the number (1,000,000).
- eu uses European style separators which places periods between each three digits of the number (1.000.000).
Prefix will add a format-specific prefix to the value:
- 0x if the value is hex (0x3FFF).
- 0 if the value is octal (03777).
FmtReal - Format a Real (Floating Point) Value
This function controls how Real (floating point) numbers will appear in a String.
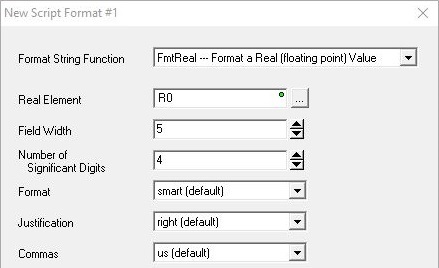
Real Element is the memory location that holds the Real (floating point) value to format. This can be any readable numeric memory location in the CPU. If the number to be formatted is NOT a Real number it will be promoted to a Real then the modifiers will be applied, for example, if you specify an integer (like D0), D0 will be converted to a Real, then the modifiers will be applied.
Field Width is the minimum number of digits to the left of the decimal point. This can be 1 to 255 digits. The value is not truncated even if the result is larger than the specified Field Width. If the value is shorter than the Field Width the result is padded with blank spaces.
Number of Significant Digits has different meanings based on the Format specified below:
For dec and exp format: it defines the number of digits to the right of the decimal point.
For smart format : it defines the total number of significant digits.
The range of valid values is 0 to 254; 255 has no effect for smart format. If there are fewer digits in the number than are specified, the number will be padded with zeros. If needed, the number will be rounded up.
Format
- dec will display the value as a full number in decimal notation (1500000000.0).
- exp will display the value in exponential form (1.5E10).
- smart (default) will display whichever is the shorter of dec or exp.
Justification controls the alignment of the digits within the Field Width specified above (typically used to align columns of numbers):
- right will right justify the number and pad with leading spaces if needed.
- left will left justify the number and pad with trailing spaces if needed.
Commas specifies whether commas will be placed in the result:
- us uses US style separators which places commas between each three digits of the whole number and a period to separate the whole number and the fraction (1,000,000.00).
- eu uses European style separators which places a period between each three digits of the whole number and a comma between the whole number and the fraction (1.000.000,00).
FmtBit - Format a Bit Value
This function controls how Bit values will appear in a String.

Bit Element is the memory location that holds the Bit value to format. This can be any readable Bit memory location.
Format selects the style of formatted text:
- val (default) will place the numeric value (0 or 1) of the bit location in the String.
- onoff will place the text " OFF" in the String if the value of the bit location is 0, and will place "ON" in the String if the value of the bit location is 1.
- truefalse will place the text " FALSE" in the String if the value of the bit location is 0, and will place "TRUE" in the String if the value of the bit location is 1.
TimeStamp - Format a Date / Time Stamp
Generates a Time Stamp (both Time and Date )from the CPUs real-time clock's current value.

Resolution selects the level of detail for the Time:
- min will not include seconds.
- sec (default) will include whole numbers of seconds.
- tenths will include tenths of a second.
- hundredths will include hundredths of a second.
- thousandths will include thousandths of a second.
Clock Time Type selects the formatted style of the text:
- local (default) will use $LocalTime which has been adjusted for time zone and daylight saving mode.
- utc will use UTC time with no adjustments.
FmtDate - Format a Date
This function formats the date portion of a Date / Time structure.

Date / Time Struct or Numeric is a location that contains the date information to format. This can be any system-defined Date/Time structure (SDT0 - SDT7), any user-defined Date/Time structure (UDT0 - UDTx), the .Date field of any Date-Time structure, or any DWord location containing a value that has been sourced from the .Date field of a Date/Time structure.
Format selects the style of the formatted date:
- us - m/d/yyyy specifies month (1 - 12) / date (1 - 31) / 4 digit year (1970 - 2038).
- eu - d/m/yyyy specifies date (1 - 31) / month (1 - 12) / 4 digit year (1970 - 2038).
- asia - yyyy/m/d specifies 4 digit year (1970 - 2038) / month (1 - 12) / date (1 - 31).
FmtTime - Format the Time
This function formats the time portion of a Date / Time structure.

Date / Time Struct or Numeric contains the time information to format. This can be any system-defined Date/Time structure (SDT0 - SDT7), any user-defined Date/Time structure (UDT0 - UDTx), the .Time field of any Date-Time structure, or any DWord location containing a value that has been sourced from the .time field of a Date/Time structure.
Format selects the style of the formatted time:
FmtString - Format a String
This function adjusts the length of a string and sets the left / center / right justification of the text within a string.
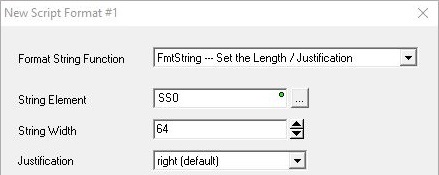
String Element contains the text to justify. This can be any writable user-defined String (max 1024 bytes), any system-defined Short String (SS0 - SS127, max 64 bytes), or any system-defined Long String (SL0 - SL63, max 256 bytes).
String Width is the maximum number of characters in the target string to work with.
Justification selects the position of the String Element text within the Width:
- Right (default) will position String Element in the rightmost characters of the target string, remaining characters to the left are filled with spaces.
- Center will position String Element in the central characters of the target string, remaining characters to the left and to the right are filled with spaces.
- Left will position String Element in the leftmost characters of the target string, remaining characters to the right are filled with spaces.
FmtTimer - Format a Timer Accumulator Value
This function controls how Timer Accumulator values will appear in a String.
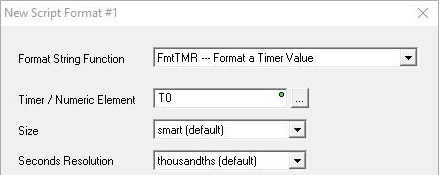
Timer Struct or Numeric contains the Timer information to format. This can be any system-defined Timer structure (T0 - T255), any user-defined Timer structure, or any numeric memory location.
Size selects how to format the Hours and Minutes information:
- smart (default) will only include the hours and minutes if they are not 0 (for example: 15m 43.385s).
- full will always display the hours and minutes (for example: 0h 15m 43.385s).
Seconds Resolution selects the amount of information about the seconds to display:
- sec will display only whole numbers of seconds (for example: 0h 15m 43s).
- tenths will display down to tenths of seconds (for example: 0h 15m 43.3s).
- hundredths will display down to hundredths of seconds (for example: 0h 15m 43.38s).
- thousandths (default) will display down to thousandths of seconds (for example: 0h 15m 43.385s).
Lookup - Select a String based on a Value
This function selects the string at the position indicated by the selector's value from the given list of strings. The first string in the list is selected when the selector's value is 0. The last string in the list is selected if the selector value is negative, or if the selector value is greater than the total number of strings in the list.
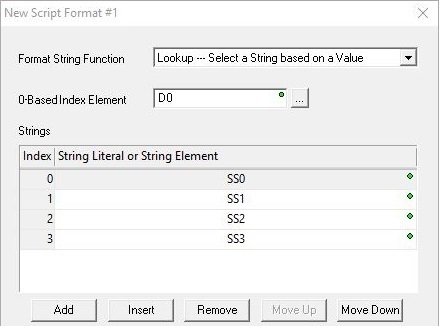
0-based Index Element is the numeric memory location that contains the value that selects the String. This can be any readable numeric memory location.
Strings is the list of Strings that correspond to the 0-based Index values. The list of strings can contain String literals, any writable user-defined String (max 1024 bytes), any system-defined Short String (SS0 - SS127, max 64 bytes), or any system-defined Long String (SL0 - SL63, max 256 bytes).
The buttons below the table provide functions for organizing the rows in the table: Add opens the row editor sub-dialog so that a new entry can be added to the end of the table. Insert inserts an empty row before the currently selected row / Edit opens the currently selected row in the row editor sub-dialog / Remove deletes the currently selected row. Move Up / Move Down moves the currently selected row up one row or down one row respectively.
Raw - Copy Bytes from Numeric Memory to a String
This function places bytes of data from numeric data blocks into a String. This is typically used when implementing a protocol driver that does not use ASCII characters for data.
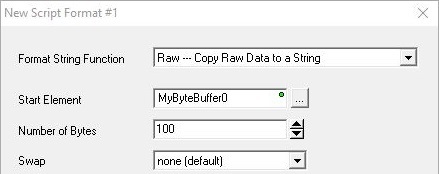
Start Element is the numeric data block that contains the source bytes. This can be any can be any readable Byte, Word, or DWord numeric memory location. Start Element must resolve to the address of a Byte memory location, so you cannot specify a single Bit element, or a constant value. You can however use a BYTE Cast to send 8 consecutive bits, for example X0:B would send bits X0- X7.
Number of Bytes is the number of consecutive bytes to put into the String. This can be any constant from 1 to 1023.
The Swap options can change the order in which the bytes will be placed in the String:
- none (default) means the Bytes will be placed into the String in the same order the appear in the memory block.
- bytes means the Bytes in each Word will be swapped.
- words means the Words in each DWord will be swapped.
- both means the Bytes in each Word will be swapped and the Words in each DWord will be swapped.
Fill - Fill a String with a Character
This function places the same hexadecimal constant in the specified number of consecutive locations in a String.

Hexadecimal Constant is the constant Hex value (0x00 to 0xFF) to place in the String.
Fill Length is the number of consecutive copies of the specified Hex Constant to place in the String
Using the Text-Based Editor to build the Message Body
When using the text-based editor, the Message Print Script is a single form that can contain any combination of PLC data elements (with or without data formatting functions), existing Strings, and Sting Literals![]() Zero or more characters enclosed in double quotes, as in "hello", and may include both simple escape sequences (such as \t for the tab character) and hexadecimal data (such as 0xAA). (which can be both printable and control character escape sequences). For a complete description of the available
data formatting functions for use in the Print Script,
see the Help reference for
the String Scripting Language.
Zero or more characters enclosed in double quotes, as in "hello", and may include both simple escape sequences (such as \t for the tab character) and hexadecimal data (such as 0xAA). (which can be both printable and control character escape sequences). For a complete description of the available
data formatting functions for use in the Print Script,
see the Help reference for
the String Scripting Language.
If the resulting contents of the Message Print Script exceeds 1023 characters of data, the Message Print Script will contain only the number of characters it can store - the remaining characters are lost - and a 'Buffer overflow' Warning will be generated.

File System selects which of the available file systems contains the file.
@RamFS is the 1 MB file system in the Do-more CPU's system RAM. All Do-more CPUs will have this file system available.
@SDCardFS : on PLC systems that have the micro-SD card slot, this selection is the file system on the removable media in that slot.
File Name - the full path (including any directories) of the file on the specified file system. This can be text enclosed in double quotes, or any system or user-defined string. The File Name allows a maximum length of 255 characters including spaces and non-alphanumeric characters, excluding the following characters which have special meaning to the file system * ? " : < > | . The File Name is not case sensitive.
Enable the Delete File After Email Sent option to delete the specified file AFTER the Email has been successfully sent to the specified SMTP Server. If the Email is not successfully sent the file will not be deleted.
Sending an email involves moving the email message from Do-more's SMTP client to its SMTP server. At the at point the SMTP server is responsible for getting the email to the recipient's SMTP server, that SMTP server is then responsible for getting the email to the recipient's SMTP client. This means that successfully sending an email from the Do-more CPU only implies that the SMTP Server received a copy of the email, it does not mean that the end recipients actually received the email.
The On Success and On Error parameters specify what action to perform when this instruction completes. You do not have to use the same type of selection for both On Success and On Error.
If the Set Bit selection is used for either On Success or On Error, the specified BIT location will be SET OFF when the instruction is first enabled and will remain OFF until the instruction completes. Once complete, the appropriate Success or Error bit location ON. The specified Bit location is enabled with a SET (Latch) operation meaning that it will remain ON even if the input logic for the instruction goes OFF.
If the JMP to Stage selection is used for either On Success or On Error the target Stage must be in the same Program code-block as this instruction, you cannot specify a target Stage that exists in a different Program code-block. When the operation finishes, the target Stage will be enabled the same way as a standalone Jump to Stage (JMP) instruction would do it. The JMP to Stage option will only be available if this instruction is placed in a Program code-block.
On Success selects which of the following actions to perform if the operation is successful:
- Enable SET Bit then specify any writable bit location.
- Enable JMP to Stage then specify any
Stage number from S0 to S127 in the current Program code-block.
On Error selects which of
the following actions to perform if the operation is unsuccessful:
- Enable SET Bit then specify writable bit location.
- Enable JMP to Stage then specify any Stage number from S0 to S127 in the current Program code-block.
If either the On Success or On Error selections are set to JMP to Stage, Automatically create the SG box for any NEW stage number will be enabled which will automatically create any target stage that does not already exist.
- Below this rung will create the new target stage on a new rung following this instruction.
- At end of code-block will create the new target stage as the last rung of this Program.
Click OK to save changes, click Cancel to abort changes, click Script Help to open the String Scripting Language Reference, or click Switch to Table Editor / Switch to Text-Based Editor to toggle between the two editor styles.
Status Display:
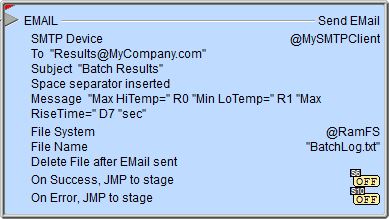
The red triangle in the upper left corner of the status display indicates this is a Fully Asynchronous instruction.
The gray triangle at the right end of the input leg indicates the input is edge-triggered, meaning this instruction will execute each time the input logic transitions from OFF to ON.
Testing the Send Email Instruction:
When the SMTP Client device was created, the Verify SMTP Server Configuration utility was available to test the SMTP Client configuration from within Do-more Designer. But that doesn't guarantee the configuration will work once it's downloaded to the PLC if the PLC will be deployed on a different network, or if at some point in the future the stored configuration no longer matches the SMTP Server being targeted. The CPU has two System Strings that automatically receive error and status
information while the CPU is in RUN mode - the contents of these
two system strings can be viewed on the System
Status tab of the System Info dialog, or by adding MSG and ERR to
a Data View:
The system string MSG receives status information and any time an instruction sets an error code.
The system string ERR will display an associated text message that explains what the error code means.
Do-more Logger
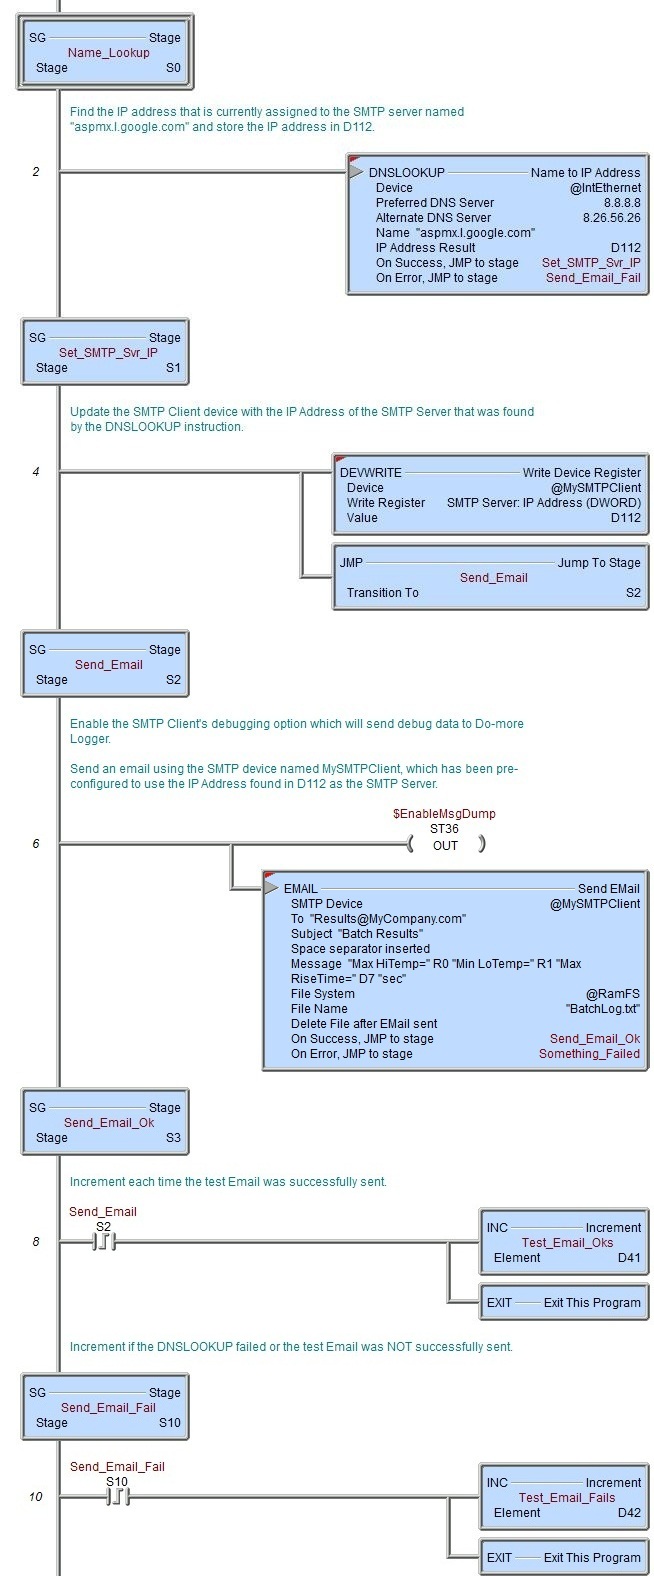
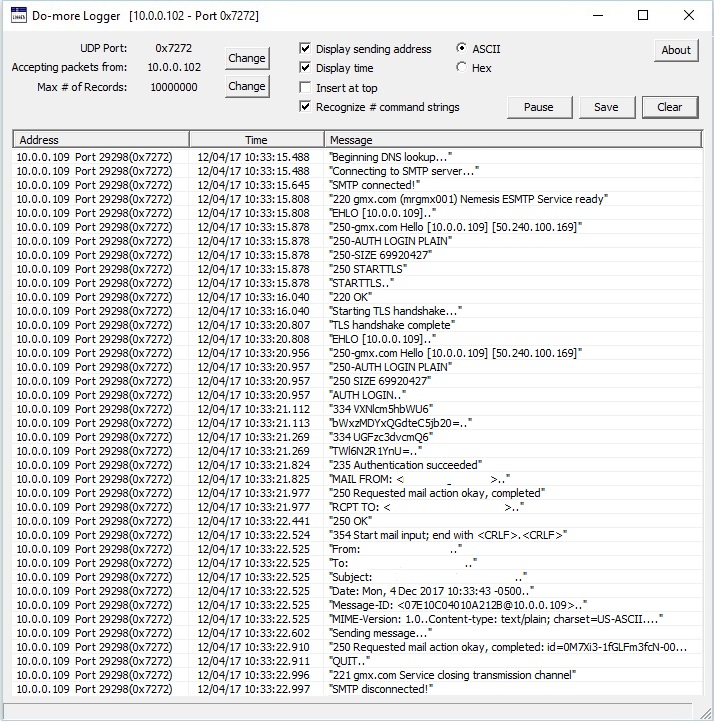
By far, the most useful tool for debugging problems with getting Email to function properly from the PLC's perspective is Do-more Logger. Setting the system status bit $EnableMsgDump (ST36) ON will cause the Send Email instruction to automatically echo the SMTP traffic between the Do-more CPU and the SMTP Server to the Do-more Logger. Do-more Logger will capture and display this SMTP conversation which allows to programmer to see what changes need to be made to correct any errors.
Send a Text Message via Email
Another option to test the SMTP Client is to send an Email to one of the cellphone carriers email-to-text services so that a text message is generated and sent to the specified cell phone number instead of an email. The web site http://www.emailtextmessages.com/ contains a list of email addresses that can be used to send text messages to phones. This is the most simple way of sending text messages from the Do-more CPU to a cell phone. These email addresses essentially act as a direct link to a carrier's SMS gateway. For example, for Verizon customers use TenDigitPhoneNumber@vtext.com as the Send To address.
The SMTP Protocol Primer
A typical example of sending a message via SMTP to two mailboxes (alice and theboss) located in the same mail domain (example.com or localhost.com) is reproduced in the following session exchange. In this example, the conversation parts are prefixed with S: and C:, for server and client, respectively; these labels are not part of the exchange.
S: 220 smtp.example.com ESMTP Postfix
C: HELO relay.example.org
S: 250 Hello relay.example.org, I am glad to meet you
C: MAIL FROM:<bob@example.org>
S: 250 Ok
C: RCPT TO:<alice@example.com>
S: 250 Ok
C: RCPT TO:<theboss@example.com>
S: 250 Ok
C: DATA
S: 354 End data with <CR><LF>.<CR><LF>
C: From: "Bob Example" <bob@example.org>
C: To: "Alice Example" <alice@example.com>
C: Cc: theboss@example.com
C: Date: Tue, 15 January 2008 16:02:43 -0500
C: Subject: Test message
C:
C: Hello Alice.
C: This is a test message with 5 header fields and 4 lines in the message body.
C: Your friend,
C: Bob
C: .
S: 250 Ok: queued as 12345
C: QUIT
S: 221 Bye
{The server closes the connection}
After the SMTP client establishes a reliable communications channel to the SMTP server, the session is opened with a greeting by the server, usually containing its fully qualified domain name (FQDN).
The client initiates its conversation by responding with a HELO command identifying itself in the command's parameter with its FQDN (or an address literal if none is available).
The client notifies the receiver of the originating email address of the message in a MAIL FROM command. In this example, the email message is sent to two mailboxes on the same SMTP server: one for each recipient listed in the To and Cc header fields. The corresponding SMTP command is RCPT TO. Each successful reception and execution of a command is acknowledged by the server with a result code and response message 250 Ok.
The transmission of the body of the mail message is initiated with a DATA command after which it is transmitted verbatim line by line and is terminated with an end-of-data sequence. This sequence consists of a new-line (<CR><LF>), a single full stop (period), followed by another new-line. Since a message body can contain a line with just a period as part of the text, the client sends two periods every time a line starts with a period; correspondingly, the server replaces every sequence of two periods at the beginning of a line with a single one. Such escaping method is called dot-stuffing.
The server's positive reply to the end-of-data, as exemplified, implies that the server has taken the responsibility of delivering the message. A message can be doubled if there is a communication failure at this time, e.g. due to a power shortage: Until the sender has received that 250 reply, it must assume the message was not delivered. On the other hand, after the receiver has decided to accept the message, it must assume the message has been delivered to it. Thus, during this time span, both agents have active copies of the message that they will try to deliver. The probability that a communication failure occurs exactly at this step is directly proportional to the amount of filtering that the server performs on the message body, most often for anti-spam purposes.
The QUIT command ends the session. If the email has other recipients located elsewhere, the client would QUIT and connect to an appropriate SMTP server for subsequent recipients after the current destination had been queued. The information that the client sends in the HELO and MAIL FROM commands are added as additional header fields to the message by the receiving server. It adds a Received and Return-Path header field, respectively.
The server responds with a 221 reply then closes the communication channel.
SMTP Server Response Codes
See Also:
EMAIL - Send Email
SETUPIP - Setup TCP/IP Parameters
SETUPNOD - Setup Ethernet Node Parameters
DNSLOOKUP - Name to IP Address
Related Topics:
SMTP Client Device Configuration
Network Message Viewer (Do-more Logger)
Example using Stages:
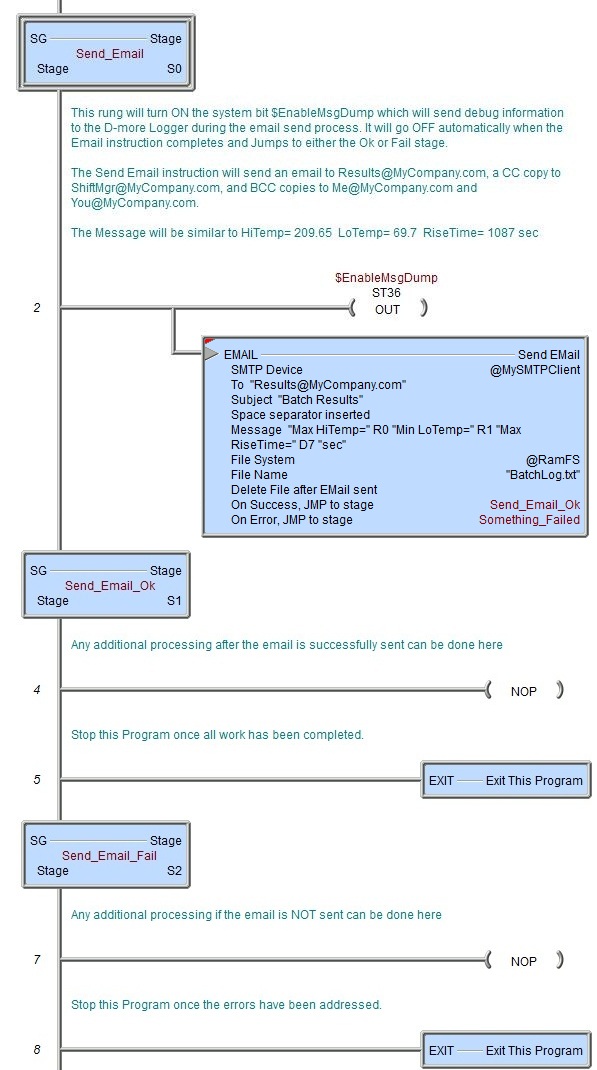
Rung Example:
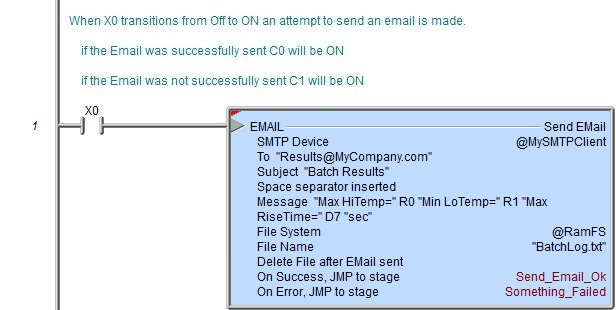
Example of Resolving the SMTP Server IP Address at Runtime:
