Topic: DMD0222

Setting the CPU Clock
Do-more CPUs store the date and time
internally in UTC (Coordinated Universal Time)![]() UTC (Coordinated Universal Time) is the primary time standard by which the world regulates clocks and time. Time zones around the world are expressed as positive or negative offsets from UTC, as in the list of time zones by UTC offset. UTC is used in many Internet and World Wide Web standards. The Network Time Protocol, designed to synchronise the clocks of computers over the Internet, encodes times using the UTC system., and automatically generates the local
time ($LocalTime) by applying the following two user-specified adjustments:
UTC (Coordinated Universal Time) is the primary time standard by which the world regulates clocks and time. Time zones around the world are expressed as positive or negative offsets from UTC, as in the list of time zones by UTC offset. UTC is used in many Internet and World Wide Web standards. The Network Time Protocol, designed to synchronise the clocks of computers over the Internet, encodes times using the UTC system., and automatically generates the local
time ($LocalTime) by applying the following two user-specified adjustments:
The Time Zone can be adjusted at runtime by changing the system variable $TimeZone (DST384). Be aware that the time zone is specified in minutes relative to UTC. For example, US Eastern Time is UTC -300 minutes, so $TimeZone would contain the value of -300.
The clock in the Do-more CPUs DO NOT automatically adjust for Daylight Saving Time. This adjustment is done manually to avoid conflict with widely varying local laws. Daylight Saving Time is adjusted at runtime through the system variable $SummerTime (ST768). Setting $SummerTime to 'true' automatically adds one hour to the local time calculation.
The rendering of the local date and time in the CPU follows this pattern:
$UTC (DST21) + ($TimeZone (DST384) * 60) + ($SummerTime (ST768) * 3600) = $LocalTime (DST22)
Set the Clock with Do-more Designer
The Date and Time in a Do-more CPU
can be manually set by using Do-more Designer's PLC -> Set
PLC Clock utility which will synchronize the CPU's
clock with the connecting PC's clock or manually enter the date and time information.
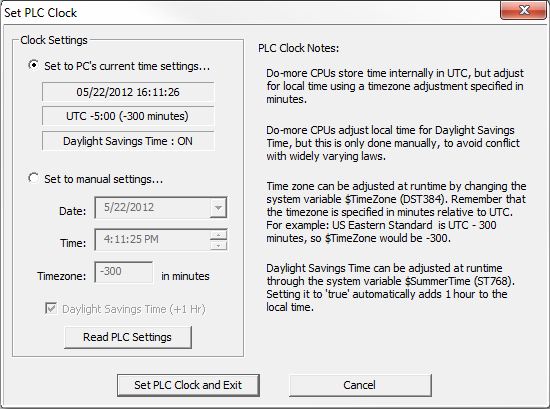
Clock Settings
- change the System Clock
Set to PC's current time settings ... displays the current date, time, and time zone settings from the PC running the Do-more Designer programming software.
The selections in the Set to manual settings ... are used to enter the date, time and time zone settings.
Clicking the down arrow will display a calendar from which you can select the Date.
Clicking the up and down arrows will change the Time.
Enter the number of minutes relative to UTC to change the Time zone.
Click the Daylight Savings Time checkbox to automatically add one hour to the local time.
Click Read PLC Settings to read the current date, time, and time zone settings from the CPU.
Click the Set PLC Clock and Exit button to update the date, time, and time zone settings, then close the dialog
Click the Cancel button to close the dialog and leave the date, time, and time zone settings intact.
Set the Clock with Ladder Logic
The Date and Time in a Do-more CPU can be set by using the Set PLC Date / Time (SETTIME) instruction in the project to set the clock to values entered from an external source - like an HMI. The external data must reside in a User Date / Time structure or a System Date / Time Structure.
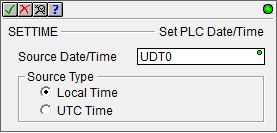
Select Local Time if the Source Date / Time represents Local Time (which includes adjustments for Time Zone and Daylight Saving Time).
Select UTC Time if the Source Date / Time represents a UTC time (which does NOT include adjustments for Time Zone and Daylight Saving Time).
Set the Clock with a Timer Server
The date and time for an Ethernet-equipped Do-more
CPU can automatically be set by retrieving the time value from
a Simple Network Time Protocol (SNTP) time server. There are two levels,
or tiers, of Simple Network Time Protocol (SNTP) time servers that are
available on the Internet:
First-level time servers (stratum one) are primarily intended to act as source time servers for second-level time servers. The first-level time servers may also be capable of providing mission-critical time services. Some first-level time servers may have a restricted access policy.
Second-level time servers (stratum two) are intended for general SNTP time service needs. Second-level time servers usually enable public access. It is recommended that you use second-level time servers for normal SNTP time server configuration because they are usually located on a closer network that can produce faster updates.
Host Engineering does not maintain the list of time servers or recommend one time server over the other one. These links are for your reference and research to select the time server that is appropriate for your configuration. Host Engineering does recommend that you use one of the Stratum 2 Time Servers.
To find the Stratum 2 Time Servers that are available, visit the following Web site:https://support.ntp.org/bin/view/Servers/StratumTwoTimeServers
Note: at the following Web site:"Rules Of Engagement"Before using the Stratum Two Time Servers, please read the
https://support.ntp.org/bin/view/Servers/RulesOfEngagement
Note: this instruction DOES NOT support NTP protocol, it only supports SNTP protocol.
Do-more PLCs can use the SNTP Client (NETTIME) instruction to retrieve clock and calendar information from a time server using the SNTP protocol. The time value retrieved from a time server is in UTC coordinates, so after the new time value is retrieved and stored in $UTC (DST21), the normal rendering of the local date and time will then happen as mentioned earlier:
$UTC (DST21) + ($TimeZone (DST384) * 60) + ($SummerTime (ST768) * 3600) = $LocalTime (DST22)
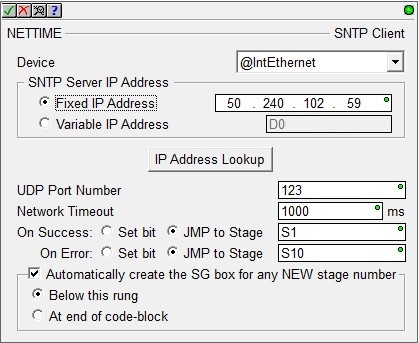
The default SNTP Server IP Address of 12.69.41.165 is the SNTP server (ntp2.hosteng.com) at Host Engineering. This IP address is found in the file DmDesignerX_Y.Ini, in the value named SNTPAddress. The value stored there is not in the traditional dotted decimal (xxx.xxx.xxx.xxx) form, but it can be displayed using the 'IP Address' format in a Data View to see it in the normal format.
The default UDP Port Number of 123 is the traditional port number used by the SNTP protocol.
Note: While it is reasonable to use the default time server for testing purposes, be aware that the uptime of the default time server can not be guaranteed. It is recommended that you install your own time server or select a publicly available time server for long-term use.
See Also:
Synchronizing the Clocks on Multiple Do-more CPUs